Just in case you're all getting bored (probably) and want a change from the construction blog and our opinions on everything (certainly), we've moved the blog from our first trip in 2015 to this one to give you something else to read.
Just click on "2015" for our first attempt at this lark. Obviously it'll contain some references that may not make a lot of sense since it was never intended that this blog - from 2016 - should be a natural sequel to the earlier one. We've also made a few references to other trips which are probably best left as they are.
Thursday, 30 March 2017
Wednesday, 29 March 2017
You can't really sleep in there....can you?
Yes, that was the idea when we started. It is, though, mighty cramped and not something you'd want to be doing very often, which is probably what really makes Daphne not a "motor caravan" by most people's definition. It works for a solo traveller, especially if the environment is a bit hostile. Like, with bugs of the Midgie variety. But even in an emergency - or a quick 40 winks on a long journey - it requires some patience to make it work. Stuff has to be moved out of the way before the beds can be sorted out and if 2 people are involved this generally means some comedy in such a confined space. Cosy, though.
Clearly, accommodation options need to be assessed for comfort and practicality too, and since we'
ve both done plenty of backpacking we're used to ground tents, their advantages and otherwise. With the ability to carry something a little larger than a Pup tent (that gives our age away, right?) we looked at the options, and there are a lot:
1. Standard touring tents.
Either backpacking tents on steroids or full blown "family" tents with party rooms, 2 bathrooms and fully fitted kitchens. Probably OK for a base camp but a bit of a chore to take apart and then reassemble every day.
2. "Quick-Pitch"/Pop-Up/festival tents.
 Are you serious? Well these are actually quite useful in that they give you somewhere to store outdoor/wet gear and stuff you don't need inside the truck. Quite a good idea on kayaking trips to keep all that salty kit separate and away from any metal. We bought one for this reason but as somewhere to live/sleep....nah. However...it did come in useful later when we experimented with other options.
3. Expedition tents.
 Various styles ranging from teepees in ripstop nylon to original canvas bell tents complete with stoves and reindeer-skin carpets. Mike helped to put up a teepee-style tent on a kayaking trip and while it gave plenty of space it took 20 minutes just to get it up. Without several people working at it this would be quite a challenge in bad weather. We quite liked the Oz-tent design, though, and put it on our shortlist for another look once we'd explored...
...4. Roof-Top Tents, or RTTs as I believe they're called.

We quite liked the idea of sleeping on the first floor, so to speak, but were a bit put off by the weight of these things - in excess of 60kgs,some of them - and the load rating of the Defender roof gutters is supposedly 75kgs in total. Given that the steel rack probably accounted for about a third of that we were going to be over the limit on the design spec. There's probably a healthy safety margin factored into that figure, but we couldn't find anyone who'd admit to what it might be. And the weight of gold one would take from the purse...Hannibal tent, sir? Or second mortgage? On top of that (no pun intended) there was the taking up of essential kayak-carrying space on the roofrack. Initially we discounted RTTs, but our interest in a Moroccan trip changed our minds later.
5. "Annex"-type tents that use the Defender's body as part of the support.
 There are several of these around and they looked quite cleverly designed. Some could be used on their own while others wouldn't stand up without being attached to the vehicle.

This would preclude them being left in-situ while the vehicle left the site for a while, if only to get the groceries. All of them had the feel of a "lash-up" although most had been cleverly thought out and would be adequate for the occasional outing or for a wet weather shelter at the beach. We didn't feel that they'd be substantial enough for our needs.The military solution is the "9x9" (feet square) tent with a roll-up side into which the vehicle is shoved. Mike's experience of these has been good, but they are very heavy and awkward for 2 people to put up and dismantle if one of them isn't 6 feet tall!
6. Awnings and add-on side panels (to make a "room").
 We'd already made an awning -which was really no more than a sunshade - and thought about adding some side panels to make a sleeping area. Advantages? Quick-pitch, self contained. But...still dependent on the vehicle for support, can't be "de-coupled" for the day trip from the site. To be properly weather and bug-proof it would need to be a more substantial structure than we could achieve with the materials and tools we had and the more substantial it became the less "quick pitch" it would be.We'd need to buy something "proper". Which equals expensive and heavy and not what we'd want to do for an experimental solution.
Here's our homemade awning:
It's really no more than 2 pieces of 12mm ply suitably stiffened and
attached to the rack using farm gate hinges. The cover is shower curtain
material. Since this is very light we reckoned the awning would be
self-supporting on the heavy hinges and not need any vertical supports.
This was correct. We originally made the cover removable using
turnbuckles, but we realised that it'd roll up and stow quite well so it
could be left in place.
 However, the lightweight material had a major drawback; it wasn't strong enough nor taut enough to resist the "pooling" of rain, so any time there was any wet weather we'd be pushing bulges of water out of it - with all the accompanying splashes, mud, puddles etc. We tried to tighten it by using a telescopic "spreader bar" between the side arms which helped a bit but not enough as there's too much stretch in the material to let water run off quickly. You can see, though, that the height of the Defender married up well with the height of the Oz-tent, a benefit we made use of later.
All this prompted us to sit down and assess what we needed and how we would use it. Base Camp or Touring? Flat, grassy terrain or rocks? Quick pitch? Storm proof? Bug proof? Standing room or get-dressed-on-your-back? Camp beds or mats? Sleep double or single? Crawlycreature proof? The list is potentially endless, which probably explains why there are so many options available. Everyone will have a different set of priorities on their wishlist. We reckon this is a Good Thing; if nothing else it keeps the market interesting and the choices wide.
So, winding the clock back a bit, the initial requirement back in 2010 was for a Base Camp system. Daphne would be used, once the destination was reached, for carrying boats and people to and from a launch point and returning to the Beer Fridge by sunset. This would be on a "proper" campsite hence flat, grassy and immune from most ground-based predators. If we were touring in Continental Europe the tent would need to be reasonably easily (read quickly) pitched and packed since we'd probably be moving every other day if not more often but using established sites which would be Flat and Grassy. There would be a need to leave the tent on-site for some of the time.
At the time, these criteria ruled out the RTT. Even though these are "quick set-up", if you intend to return to the same site in the evening your "pitch" won't be reserved by the presence of your tent, so you run the risk of getting the last space - if you're lucky - which will inevitably be next to the chemical loo disposal or the discobar. For the same reason the Awning combination wouldn't work and neither would most of the Annex-type designs since they need the vehicle to hold them up. Festival or "pop-up" tents are too basic and cramped but might be useful as a marker to reserve our pitch if we decided on a vehicle-attached option in future. Family tents take too long to set up and pack up, not to mention being generally bulky and far too well-appointed for what we need although some of the teepee designs were attractive in some ways. Military surplus with modifications = heavy and difficult to manage for the two of us. This left us looking at the likes of the Oz-tent. Heavy duty, well made but expensive. Very quick to pitch and strike. Flexible in their use in that they can be pitched alongside the vehicle but "connected" to it. Good reviews but mainly from those who are travelling the Simpson Desert or Namibia, not The Outer Hebrides or France. Would this be overkill?
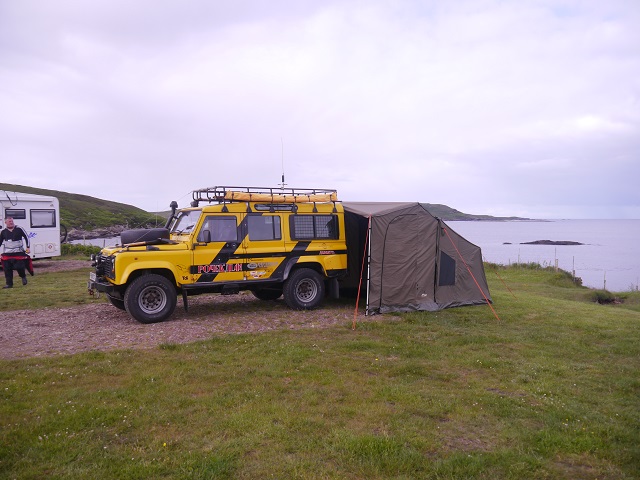
Our visit to Adventure Overland provided the chance to look at the options in detail. We went, we saw, we felt the quality and measured the width. We climbed in, crawled under, looked over, smelled, scrutinised, hummed, hah-ed and haggled. And we bought an Oz-tent, the RV-3 model for a bit of extra space. With the bits that go on the side. It looks like this:

Once the Defender is set up alongside, it can look like this:

or like this:

or this:

The sales blurb claims this tent can be pitched in 30 seconds. This is no lie. In fact from putting the parking brake on, Mike could have the tent off the rack, set up and beds ready before the kettle had boiled. The side panels took a little longer to attach as these zip on. The zips are good quality, heavy duty things but we did manage to have one break on us soon after we started using it. The supplier replaced it for free. Getting the panels aligned to do the zips up can be awkward and although it can be done solo, 2 people make the job a lot easier as the panels are quite awkward to manipulate, especially in a wind.

The extra shelter they give under those conditions is worth it. Set up as in the picture it is exactly the right height to allow the back or side of our Defender to be completely enclosed, similar to the "Annex" tents, but without needing to be attached. Note that if you fit your Landy with beefy lifted suspension this may not work so well.
 We found the interior just long enough - front to back - to allow us to fit 2 camp beds in although they touched the walls at each end. We also experimented with thick sleeping pads which were very comfortable but were a pain to carry since they took up so much space in the back. We like to have easy access to the "kitchen" during the day so to have to unload a lot of kit to have a brew or make lunch isn't ideal.
Other points:
1. The sewn-in groundsheet is very tough but the feet of a camp bed might challenge it on soft ground. We'd recommend padding to protect it.
2. There's plenty of ventilation and we needed to use it most of the time; that is, peg the rear window flap open and keep the top half of the side windows unzipped a bit or condensation becomes a nuisance. No worse than on other tents we've used and a flysheet might remove the problem if you can afford one- and be bothered to fit it. As supplied and in a European climate the moisture tended to collect on the aluminium frame and drip onto our beds or clothes if we'd hung them up at night. It was also something which slowed us down when packing up as we'd either have to dry the inside with something or wait until the sun did the work for us. In practice we did the latter but at the end of the day when we tried to pitch while the sun was still high enough to air the tent before we set up beds.
3. It's heavy. Just about manageable for one person but to get it onto the rack is quite a heave and to avoid damage it's probably best to consider it a 2-person job. Mike did try to balance the tent on it's end against Daphne's flank and then pull it up onto the rack, but the rocking about as he climbed onto the roof sent the tent sliding sideways, nearly wiping off a door mirror.
Just as an experiment we made a frame that "plugged in" to 2 tubes tie-wrapped to the rack. With a curtain this gave us an enclosed area at the rear which was ideal for a shower room.


Clearly, accommodation options need to be assessed for comfort and practicality too, and since we'
ve both done plenty of backpacking we're used to ground tents, their advantages and otherwise. With the ability to carry something a little larger than a Pup tent (that gives our age away, right?) we looked at the options, and there are a lot:
1. Standard touring tents.
 |
| "It's your turn to fill the waterbed". |
Either backpacking tents on steroids or full blown "family" tents with party rooms, 2 bathrooms and fully fitted kitchens. Probably OK for a base camp but a bit of a chore to take apart and then reassemble every day.
2. "Quick-Pitch"/Pop-Up/festival tents.

3. Expedition tents.

...4. Roof-Top Tents, or RTTs as I believe they're called.

We quite liked the idea of sleeping on the first floor, so to speak, but were a bit put off by the weight of these things - in excess of 60kgs,some of them - and the load rating of the Defender roof gutters is supposedly 75kgs in total. Given that the steel rack probably accounted for about a third of that we were going to be over the limit on the design spec. There's probably a healthy safety margin factored into that figure, but we couldn't find anyone who'd admit to what it might be. And the weight of gold one would take from the purse...Hannibal tent, sir? Or second mortgage? On top of that (no pun intended) there was the taking up of essential kayak-carrying space on the roofrack. Initially we discounted RTTs, but our interest in a Moroccan trip changed our minds later.
5. "Annex"-type tents that use the Defender's body as part of the support.


 |
| Military surplus 9x9 |
6. Awnings and add-on side panels (to make a "room").

Here's our homemade awning:
 |
| The poles and guys are for the Oz-tent, not the awning. |

All this prompted us to sit down and assess what we needed and how we would use it. Base Camp or Touring? Flat, grassy terrain or rocks? Quick pitch? Storm proof? Bug proof? Standing room or get-dressed-on-your-back? Camp beds or mats? Sleep double or single? Crawlycreature proof? The list is potentially endless, which probably explains why there are so many options available. Everyone will have a different set of priorities on their wishlist. We reckon this is a Good Thing; if nothing else it keeps the market interesting and the choices wide.
So, winding the clock back a bit, the initial requirement back in 2010 was for a Base Camp system. Daphne would be used, once the destination was reached, for carrying boats and people to and from a launch point and returning to the Beer Fridge by sunset. This would be on a "proper" campsite hence flat, grassy and immune from most ground-based predators. If we were touring in Continental Europe the tent would need to be reasonably easily (read quickly) pitched and packed since we'd probably be moving every other day if not more often but using established sites which would be Flat and Grassy. There would be a need to leave the tent on-site for some of the time.
At the time, these criteria ruled out the RTT. Even though these are "quick set-up", if you intend to return to the same site in the evening your "pitch" won't be reserved by the presence of your tent, so you run the risk of getting the last space - if you're lucky - which will inevitably be next to the chemical loo disposal or the discobar. For the same reason the Awning combination wouldn't work and neither would most of the Annex-type designs since they need the vehicle to hold them up. Festival or "pop-up" tents are too basic and cramped but might be useful as a marker to reserve our pitch if we decided on a vehicle-attached option in future. Family tents take too long to set up and pack up, not to mention being generally bulky and far too well-appointed for what we need although some of the teepee designs were attractive in some ways. Military surplus with modifications = heavy and difficult to manage for the two of us. This left us looking at the likes of the Oz-tent. Heavy duty, well made but expensive. Very quick to pitch and strike. Flexible in their use in that they can be pitched alongside the vehicle but "connected" to it. Good reviews but mainly from those who are travelling the Simpson Desert or Namibia, not The Outer Hebrides or France. Would this be overkill?
Our visit to Adventure Overland provided the chance to look at the options in detail. We went, we saw, we felt the quality and measured the width. We climbed in, crawled under, looked over, smelled, scrutinised, hummed, hah-ed and haggled. And we bought an Oz-tent, the RV-3 model for a bit of extra space. With the bits that go on the side. It looks like this:

Once the Defender is set up alongside, it can look like this:


or this:
The sales blurb claims this tent can be pitched in 30 seconds. This is no lie. In fact from putting the parking brake on, Mike could have the tent off the rack, set up and beds ready before the kettle had boiled. The side panels took a little longer to attach as these zip on. The zips are good quality, heavy duty things but we did manage to have one break on us soon after we started using it. The supplier replaced it for free. Getting the panels aligned to do the zips up can be awkward and although it can be done solo, 2 people make the job a lot easier as the panels are quite awkward to manipulate, especially in a wind.

The extra shelter they give under those conditions is worth it. Set up as in the picture it is exactly the right height to allow the back or side of our Defender to be completely enclosed, similar to the "Annex" tents, but without needing to be attached. Note that if you fit your Landy with beefy lifted suspension this may not work so well.

Other points:
1. The sewn-in groundsheet is very tough but the feet of a camp bed might challenge it on soft ground. We'd recommend padding to protect it.
2. There's plenty of ventilation and we needed to use it most of the time; that is, peg the rear window flap open and keep the top half of the side windows unzipped a bit or condensation becomes a nuisance. No worse than on other tents we've used and a flysheet might remove the problem if you can afford one- and be bothered to fit it. As supplied and in a European climate the moisture tended to collect on the aluminium frame and drip onto our beds or clothes if we'd hung them up at night. It was also something which slowed us down when packing up as we'd either have to dry the inside with something or wait until the sun did the work for us. In practice we did the latter but at the end of the day when we tried to pitch while the sun was still high enough to air the tent before we set up beds.
3. It's heavy. Just about manageable for one person but to get it onto the rack is quite a heave and to avoid damage it's probably best to consider it a 2-person job. Mike did try to balance the tent on it's end against Daphne's flank and then pull it up onto the rack, but the rocking about as he climbed onto the roof sent the tent sliding sideways, nearly wiping off a door mirror.
Just as an experiment we made a frame that "plugged in" to 2 tubes tie-wrapped to the rack. With a curtain this gave us an enclosed area at the rear which was ideal for a shower room.
Like this:


When not in use the frame slid into the tubes on the rack.
It was a bit of a faff, though, to attach the curtain so we only used it a couple of times since site showers were always available. It was quite useful as a changing room after a kayaking session, though as Mike found it a bit of a challenge to get into and out of a dry suit while lying down in the back.
So, that's how we lived for 3 years of touring holidays and until we began planning our first Moroccan safari. This is when we did some -well, actually, a huge amount - of research into the country and the conditions we were likely to meet. We'd never taken Daphne off-road for more than a few hundred yards and had no real idea of what she and we were capable of. Clearly some kind of "trial run" would be needed and under the sort of conditions that if it all went wrong we'd have some kind of support on hand. With that in mind, we signed up for a tour of the back roads of the Alps with a guided group......
Thursday, 16 March 2017
Still trying to get it right...Daphne Mk3!
This project has become a lesson in Getting Things Wrong. Getting It Right has followed from the mistakes, but it would've been better not to make the mistakes in the first place. And cheaper, too. Take the fridge as an example. We've gone from freezer bag to electric cooler to icebox and none of them worked for us. The electric box was a total loss and we recouped about 60% on the icebox, so the next attempt had to work, which meant spending a lot more than our original budget. After the usual weeks of market research and scanning the reviews, we opted for one of these:
 This is the Waeco Coolfreeze CDF25. We also bought the transformer that allows an automatic switchover from 12v to 220/240v so we can pre-chill it or run it from site electricity. This combination cost more than we'd originally intended to spend but it actually works like you'd expect a fridge to work, and it'll do a pretty good job of freezing stuff too. In fact, if we write a list of Pros and Cons, one of the Cons is that the temperature selector doesn't have much travel (you can just see it on the far edge - the back) - it's a tiny slider, so the difference between perfect Chardonnay and a wine-flavoured icepop is about 3mm. Once used to it, though, it's very good and takes up less room than the other - unsuccessful - options. It's the same width as the kitchen unit so doesn't get in the way of the sleeping plan. The lid opens upwards, though, and because we wanted to fix it along the fore-aft axis and against the OS door this made it very awkward to open..
...so we made a sliding support plate for it similar to the cooker but using heavy duty industrial drawer runners. This allows it to be pulled to the centre of the vehicle and makes it possible to lift the lid and rummage through the contents without having to half-crouch or need 3 hands. It can also be accessed with the OSR door open which makes it easy to put the groceries etc into it. When the lid's raised it's held open by the bungee net above it. Another "con" perhaps, the lid. It's designed to be lifted right off once opened to about 80 degrees; this means that it often comes off when you didn't mean it to and it's a bit of a faff to re-engage it; we never found a fix for this.Two bits of ally angle keep the fridge in place laterally and the sliding tray locks with a bolt. A webbing strap passed from front to back over the lid holds everything secure and is tensioned with a cambuckle. We found we needed to build a "bridge" over the fridge controls or the tensioned strap would bear on these. It only needed a tiny amount of unplanned movement to convert tonight's steak dinner into tomorrow night's when we found it frozen solid. The transformer goes underneath behind the gas bottle.

We now decided to get rid of the HD bedboards, even though they were capable of being used as bridging ladders! Far too heavy for the job they did. In their place we substituted a piece of 12mm ply, suitably stiffened. This was our new table and with fold-down legs made from telescopic walking poles it hooked to the rock sliders. After a little more experimentation we altered it a little more and it became like this:

The support legs became one leg but a little more robust - the lower bit of a hospital crutch - while the other end was supported by the tube we use for extending the wheelbrace. Eventually we arranged a system where this could be plugged into a piece of correct diameter tube welded to the bottom of the roofrack ladder or strapped to the rock sliders.
This gave us several ways of setting it up depending how much shelter we needed. It was, though, still quite heavy for the job it was required to do so we carried on developing the idea.

Eventually, and for our second Morocco trip we combined the solar panel cover - yet to be discussed- with the table, so right to the end we were still improving/adapting or otherwise messing about trying to find the ideal solutions.
At about year 3 of our ownership we visited the Adventure Overland Show at Stratford. This was mainly to see how other people had solved the same problems that we were working on but also, lets be honest, to see what Landrover toys there were available that we could convince ourselves we needed. The show runs over 3 days and is well worthwhile for the reasons we went but also for the number and variety of guest speakers who run seminars or just chat. Remember that up 'til now, Daphne was a weekend kayak transporter that provided a refuge from annoying bugs and for 2 weeks in the summer had been a base for a camping holiday in France. We decided to sit in on a talk by a chap from Canada called James Davis.
We'd seen his Landrover "cabriolet" outside, complete with Dulux pink paint job, and he seemed like an interesting guy. He talked about how he'd gone with a bunch of friends and explored the Rekkam plateau in Morocco....by the time he'd finished his slideshow, we were hooked. Morocco. Let's go there. From that moment, everything we did for and to Daphne had one aim - a solo trip to the Sahara. We left the room with a bigger shopping list than we'd gone in with, in our minds at least. We went straight round to the trade stands....
....and bought some of these:
 These are Wolf boxes. They stack together, are very robust and can be used as seats, hop-ups, and bed bases if you're prepared to do a little carpentry to modify the then existing arrangements:

As you can see they were exactly the right size once we'd raised the side bins by about 2cm - a strip of wood under each long edge did that easily. This gave us more storage and allowed us to get rid of the shower-slat floor. We now had a flat sleeping platform which could be used as the bottom layer of a load stack as the boxes interlock with each other. They aren't waterproof like the previous boxes but they are a lot stronger. Cons? ("Oh, you're soooo critical") - they aren't transparent so need labels if you don't want to spend all day searching for your spare socks, and the little clips that lock the lids on can be a pain to engage and can be easily broken unless you take care. We bought some spares in metal but, to be fair, we haven't needed to use them but the design weakness is there.
Given that we'd now interfered with the geometry of the kitchen unit by making it higher, the whole lot needed redesigning since all the little corners and angles that were critical to keeping the structure stable by wedging it in place didn't work any more. In short, we'd messed up a lot of things by improving one. It wasn't exactly "back to the drawing board", but in working out the way to fix what we'd just screwed up, we could get rid of the useless sink and re-invent some other things that'd not worked as well as we'd thought.
We started with the kitchen storage. I'd thought - not being the chef - that the floor level bins and the spaces under the cooker and the the sink would be adequate. I was, ahem, advised that this was not the case. Not only was more space required, it had to be in better places and easier to access.
We still needed a sink, but in a more useful place, which turned out to be hanging off the back door...
 First, we just did this. Quick and simple, and like most things Quick And Simple, it didn't work. The bowl protruded too far and with the new Wolf boxes inside, the door wouldn't close.
This was a pity, because I put a lot of effort into making this into a proper "stainless steel" kitchen sink (OK, polished ally, but it still looks good, eh?) and broke 2 jigsaw blades doing it, All this was done before we bought the boxes....One step forward, two steps back.

So we redesigned - again - and finished up with this:

We got rid of the cardboard-and-vinyl trim and replaced it with a sheet of aluminium rescued from the bin at work, hinged a flap off it and cut a hole for the sink, which is now a collapsible plastic/rubber bowl. This allows it to fit neatly into the space at the end of the boxes. We might've got away without the bother of cutting the hole, but it gives a nice solid anti-spill place for the bowl and brings the top of it down to a good height for all sorts of uses....

We moved the first aid kit to the back door as we reckoned that to have to go searching for it inside defeats the object of having it. Likewise one of the fire extinguishers. The security grill for the window was made of the stuff used to make chicken cages. The odd bit of welding - my first project with the MIG - and some P-clips and the window is as secure as it can be without spending a lot of money. The cost of commercial grilles is ridiculous given that if someone really wants to get in they won't stop 'em for long, so these admittedly flimsy alternatives might at least discourage casual glassbreakers - the true nature of the thing can't be seen from outside. It's also a really useful place to peg up the washing. I tried the same thing on the side windows but these had to be on the outside and so a lot stronger. In the skip outside work was an old mattress base which when cut in half happened to be just the right dimensions.....

and with a bit of cunning the mounting points could be hidden. The grille was bolted on using anti-tamper fixings and some "streamlining" added to the square ends just for aesthetics. Once fitted I tried hard to pull these off and couldn't so, short of bolt cutters and a lot of time we reckoned these were at least as good for keeping the Undesirables out as the commercial alternatives.
The storage problem was less easy to fix. Obviously a more vertical arrangement was necessary but building cupboards was going to be difficult given that the whole unit was going to flex. I could see doors either jamming or flying open, turning Dapne's back end into carnage. Luckily I had these in the back of the shed:
 These were delivered to an aircraft I took into a south coast of England airport one lunchtime many years ago. The local handling agent used them to deliver our sandwiches and didn't want them back. Some folk might recognise their origin. They kicked around the hangar for a few months before I used them as garage toolboxes. Although they were a little too deep to be ideal, they're very light, well made with secure door closures and internal ribs that allow shelves to be adjusted. Too good to ignore for the project, and provided extra shelf space on top as well.

So this is pretty much the final version of the kitchen. We've hidden the main water container away in the aft cupboard and added a magnetic tool holder to the edge of the cooker to keep utensils off the (dusty) flat bits. The extractor fan with cover is above the cooker. The flap/door to the middle-level cupboard has been redesigned to fold out and lock into a double-sized table which is also removeable and can be used like this:
 ...which gives even more flat bits for the chef to cover with stuff.
So, that's the interior mods covered and is how Daphne was when we sold her last year. Now we'll move on to the outside and show you what we did about tents, awnings, roofracks and all the rest of the clobber that we (thought) we needed for our Saharan adventure.....

 |
| "Right, that's the essentials sorted, now what are we going to eat?" |
 |
| The fridge support has been altered a little to make it easier to remove. |
 |
| You can also see here the "working prototype" - upside down- of the camping table-cum-bedboard discussed later in this post. |

 |
| These drawer runners are the "double slide" type which allows the tray to move twice as far. |

The support legs became one leg but a little more robust - the lower bit of a hospital crutch - while the other end was supported by the tube we use for extending the wheelbrace. Eventually we arranged a system where this could be plugged into a piece of correct diameter tube welded to the bottom of the roofrack ladder or strapped to the rock sliders.
This gave us several ways of setting it up depending how much shelter we needed. It was, though, still quite heavy for the job it was required to do so we carried on developing the idea.
Eventually, and for our second Morocco trip we combined the solar panel cover - yet to be discussed- with the table, so right to the end we were still improving/adapting or otherwise messing about trying to find the ideal solutions.
At about year 3 of our ownership we visited the Adventure Overland Show at Stratford. This was mainly to see how other people had solved the same problems that we were working on but also, lets be honest, to see what Landrover toys there were available that we could convince ourselves we needed. The show runs over 3 days and is well worthwhile for the reasons we went but also for the number and variety of guest speakers who run seminars or just chat. Remember that up 'til now, Daphne was a weekend kayak transporter that provided a refuge from annoying bugs and for 2 weeks in the summer had been a base for a camping holiday in France. We decided to sit in on a talk by a chap from Canada called James Davis.
 |
| This might become a picture of Mr Davis and his interesting car, if I can get his permission to use it. |
We'd seen his Landrover "cabriolet" outside, complete with Dulux pink paint job, and he seemed like an interesting guy. He talked about how he'd gone with a bunch of friends and explored the Rekkam plateau in Morocco....by the time he'd finished his slideshow, we were hooked. Morocco. Let's go there. From that moment, everything we did for and to Daphne had one aim - a solo trip to the Sahara. We left the room with a bigger shopping list than we'd gone in with, in our minds at least. We went straight round to the trade stands....
....and bought some of these:


As you can see they were exactly the right size once we'd raised the side bins by about 2cm - a strip of wood under each long edge did that easily. This gave us more storage and allowed us to get rid of the shower-slat floor. We now had a flat sleeping platform which could be used as the bottom layer of a load stack as the boxes interlock with each other. They aren't waterproof like the previous boxes but they are a lot stronger. Cons? ("Oh, you're soooo critical") - they aren't transparent so need labels if you don't want to spend all day searching for your spare socks, and the little clips that lock the lids on can be a pain to engage and can be easily broken unless you take care. We bought some spares in metal but, to be fair, we haven't needed to use them but the design weakness is there.
Given that we'd now interfered with the geometry of the kitchen unit by making it higher, the whole lot needed redesigning since all the little corners and angles that were critical to keeping the structure stable by wedging it in place didn't work any more. In short, we'd messed up a lot of things by improving one. It wasn't exactly "back to the drawing board", but in working out the way to fix what we'd just screwed up, we could get rid of the useless sink and re-invent some other things that'd not worked as well as we'd thought.
We started with the kitchen storage. I'd thought - not being the chef - that the floor level bins and the spaces under the cooker and the the sink would be adequate. I was, ahem, advised that this was not the case. Not only was more space required, it had to be in better places and easier to access.
We still needed a sink, but in a more useful place, which turned out to be hanging off the back door...

This was a pity, because I put a lot of effort into making this into a proper "stainless steel" kitchen sink (OK, polished ally, but it still looks good, eh?) and broke 2 jigsaw blades doing it, All this was done before we bought the boxes....One step forward, two steps back.

So we redesigned - again - and finished up with this:

We got rid of the cardboard-and-vinyl trim and replaced it with a sheet of aluminium rescued from the bin at work, hinged a flap off it and cut a hole for the sink, which is now a collapsible plastic/rubber bowl. This allows it to fit neatly into the space at the end of the boxes. We might've got away without the bother of cutting the hole, but it gives a nice solid anti-spill place for the bowl and brings the top of it down to a good height for all sorts of uses....

We moved the first aid kit to the back door as we reckoned that to have to go searching for it inside defeats the object of having it. Likewise one of the fire extinguishers. The security grill for the window was made of the stuff used to make chicken cages. The odd bit of welding - my first project with the MIG - and some P-clips and the window is as secure as it can be without spending a lot of money. The cost of commercial grilles is ridiculous given that if someone really wants to get in they won't stop 'em for long, so these admittedly flimsy alternatives might at least discourage casual glassbreakers - the true nature of the thing can't be seen from outside. It's also a really useful place to peg up the washing. I tried the same thing on the side windows but these had to be on the outside and so a lot stronger. In the skip outside work was an old mattress base which when cut in half happened to be just the right dimensions.....
and with a bit of cunning the mounting points could be hidden. The grille was bolted on using anti-tamper fixings and some "streamlining" added to the square ends just for aesthetics. Once fitted I tried hard to pull these off and couldn't so, short of bolt cutters and a lot of time we reckoned these were at least as good for keeping the Undesirables out as the commercial alternatives.
The storage problem was less easy to fix. Obviously a more vertical arrangement was necessary but building cupboards was going to be difficult given that the whole unit was going to flex. I could see doors either jamming or flying open, turning Dapne's back end into carnage. Luckily I had these in the back of the shed:

So this is pretty much the final version of the kitchen. We've hidden the main water container away in the aft cupboard and added a magnetic tool holder to the edge of the cooker to keep utensils off the (dusty) flat bits. The extractor fan with cover is above the cooker. The flap/door to the middle-level cupboard has been redesigned to fold out and lock into a double-sized table which is also removeable and can be used like this:

So, that's the interior mods covered and is how Daphne was when we sold her last year. Now we'll move on to the outside and show you what we did about tents, awnings, roofracks and all the rest of the clobber that we (thought) we needed for our Saharan adventure.....
Thursday, 9 March 2017
Daphne Mk2 - a few improvements
If you want to register a vehicle in the UK as a "motor caravan" - which is The Law's term for what we've tried to create, you have to meet these design criteria:
A door that provides access to the living accommodation.
A bed, which has a minimum length of 1800mm or 6 feet. This can be converted from seats used
for other purposes during the day but must be permanently fixed within the body of the vehicle.
A water storage tank or container on, or in, the vehicle.
A seating and dining area, permanently attached to the vehicle. The table may be detachable but
must have some permanent means of attachment to the vehicle. It is not good enough to have a
loose table.
A permanently fixed means of storage,
A cupboard, locker or wardrobe.
A permanently fixed cooking facility within the vehicle, powered by gas or electricity.
At least one window on the side of the accommodation.
If the vehicle has all of these features present, permanently fixed and installed properly......then it's legally a "motor caravan". If you're really interested, the full brief is here.
So, job done, then! Perhaps the DVLA might raise an eyebrow or two at our interpretation of the rules, but as far as we can see, everything's there that should be. However, lets be honest, the limitations of the back of a 110 make it more akin to Backpacking-on-Wheels than having a Home-on-Wheels. You can't stand up in it, you can't really sit comfortably in it, there's no loo, heater or satellite TV but there's plenty of condensation, cramp and clutter....well, it doesn't have to be that way.....
There's not a lot that can be done about the roof height unless you cut it off and make it into a "pop-top".

There are a lot of these around and very smart they are too, but they come at quite a price. They also mean that the roof rack can only be used for light items, if at all - certainly not for carrying 4 kayaks at 20+kgs each. Some of those I've seen don't give a full 6 feet of bed space either, so the taller folk amongst us will still have to sleep "downstairs" and have our faces stepped on in the middle of the night. Bit like being in a bottom bunk in a submarine's bedroom. We briefly toyed with the idea of converting a Landrover military ambulance, but apart from the initial cost and lack of provenance, the ones we've seen seem very top heavy, rock around a lot so not really suited to Moroccan pistes and very difficult to use as a boat trolley due to the extra height. That standing room is tempting, though, not to mention the space for a massive beer fridge.
 |
| Not practical...but I still really want one! |
As far as the other downsides go, we decided that while the solutions may not be to everyone's taste or budget, we could overcome them. The design philosophy (DP) was always to make each item do at least 2 jobs, otherwise it wasn't going to find a home in Daphne.
So, basics first - "What do you do for a loo?"was one of the first questions we'd be asked. Our first attempt was a Bog-In-A-Box (That's what it said on it, I think), basically a flat-pack cardboard box with a large hole in one side and a supply of biodegradeable plastic liners. These no longer appear in a Google search and I can guess why - 1. don't get the cardboard damp or it won't hold your weight (or anything else 😞) and 2. the bags will auto-degrade to a point where they won't hold water - to use a nautical term - nor anything else either. Only you won't be able to tell that the bag has reached the point of imminent failure until after you've used it....Good job we had that rubber floor, eh? The second attempt was a proper PortaPotti. We got a good lightweight one from Germany and managed to find room for it next to the coolbox or instead of the cubby box.

To be replaced by one of these. Weighs less than a kilo, stows away easily and fulfils the DP - it can be used as a stool (eh?) as well. It's compact and easy enough to set up inside and, with the window blinds fitted, provides for this basic need pretty well under "public" conditions. The bags don't crumble away to nothing after a few weeks in storage, either, which is reassuring, and there are no chemicals involved.
Heating? Get a Webasto! Well, when our numbers come up on the Lottery we'll consider it, but until then the cooker does a good job. I can hear the howls of protest already. No, we haven't poisoned ourselves with carbon monoxide yet but yes, it's a major consideration. Luckily the gaps around the doors, a well-known Defender design feature, means that ventilation is always adequate. However, we also installed an extractor fan made from an old computer CPU fan (12volts) to deal with fumes and cooking smells, steam etc.

A Webasto or Ebersbacher heater would be good, but to be honest the noise they make cutting in and out all night is a bit annoying, apparently, and anyway we've slept comfortably enough even in a Scottish winter with a decent sleeping bag and mat. Getting up in the morning could be a challenge though...but of course the cooker/heater is only an arm's length away. We can make tea in bed without getting out of it. Luxury.
We bought a small fan heater that'd run off a campsite power outlet without tripping the CBs and we have used it occasionally. Not sure that it's really worth the space it takes up though.
Entertainment? Not really an issue for us as the view from the campsite is usually interesting enough. A laptop DVD gives us something to watch if we need a distraction but we've found that after a long day, a good meal and a glass or two we're ready to sleep rather than go to the movies. Music, on the other hand, is always welcome and we carried our preferred sounds on MP4 and laptop. Moroccan music is fine in the souk, but otherwise the radio didn't really provide what we wanted in some places we've been. In some parts of Scotland we go to, all you'll get is static anyway. We never really got around to doing a proper job of sorting this out though, until Willoughby came along (more on this later, obviously). We had some little portable speakers but these backpacker's solutions needed to be improved. We sometimes used Daphne's onboard CD player etc if we needed some decent volume, but this meant having the main battery switched on. I was always wary of doing that for more than a short time.
Condensation. Get rid of the moisture, you get rid of the problem, so see above. Actually, just breathing at night created a damp atmosphere and the occasional drip from anything metal overhead. We took the headlinings out at the very start of the conversion and lined them with camping mat closed cell foam so this stopped the cold bridge of the roof struts, but everything else that got cold got a thin sheen of condensation on it. Dapne's sunroof was generally left open a crack providing it wasn't raining and the windows were all covered with insulating foil or left open but with midge nets over them. In the end we suffered no more than when we slept in the Oz tent (see later post on tents etc), roof tent or when backpacking. I've never slept in a caravan so I can't compare the experience with that, but presumably the extra volume of a caravan reduces the problem? Dunno, and a moot point. We've got the space we've got and we'll deal with it.
Cramp. Get shorter legs? In fact the legroom wasn't a problem really, although the only way I could get really comfortable was to sit with my back to the door and stretch out. The biggest difficulty with the seating was being able to lean forward at the right angle or far enough to attend to the cookery or wash in the sink. Hard to describe and imagine, perhaps, until you've tried to do both at arm's length because there's no room to stand and get on top - literally - of what you're trying to do. Most folk do both while standing, I think. We took the sink out and moved the whole business of washing to the back door (see next post). The prototype sink was nothing more than a large dog bowl but I made the mistake of plumbing it in. This meant that to fill it we had to bring the water container -and up to 10 litres of H2O - to the sink, and it would've been much easier to do it the other way around. Using it to wash face and body was awkward, too. I like to get my face over the bowl when I wash it, and this couldn't be done without assuming some contorted crouched position. It did take quite a bit of work to fit it in though, and I was otherwise quite pleased with the result. However, in the end another unforeseen factor decided the issue....
The cooker. The original stove had an inlet on the righthand side and this wasn't moveable. This meant that in order to get a reasonably short run of hose from the gas bottle, the latter item had to be kept in the cupboard under the sink.I designed the space to fit a 904 Camping Gaz cylinder. Then they stopped making them. The next closest size is the 907. It wouldn't fit in the space, being 3 cm too tall. This meant the bottle had to be moved somewhere else and the only place I could find to put it without tearing everything else apart was under the offside passenger seat. This left the bottom of the sink and the waste pipe etc taking up a lot of what could now be empty, ie useful, space in a large cupboard. So we moved it.
 |
| The gas bottle should really be in a "ventilated compartment" but the gaps under the door probably do a reasonable job of that. The yellow thing with the hose is our pump-up shower...but not for long, as you'll see. |

This view shows all the mattress supports in place. They were made from quite thick blockboard, because that's what I had left over from making some wine racks - hence all the holes. They didn't need to be this heavy. The 2 battens fit under the coolbox and help to stop it sliding about .
The "bedboards" sit on small battens on a bulkhead piece that runs the full width of the cab at wheelarch height. The nearest board you can see here is held up by a hinged leg described already. The centre and nearside boards are supported by storage boxes and prevented from moving forward by the seat backs. All lift out but they don't have any other use...DP not met on this occasion so we need to do something about this when we do Daphne Mk3.
 |
| Note the strap that stops the storage bin lids from jumping up when we go Bumpy. The clips on the shelf hold an LED striplight for the hobs. |
The long reach to the cooker was solved by mounting the whole thing on a pair of drawer runners. This allowed it to be pulled forward far enough to make cooking more pleasant, and the extractor fan actually works and quietly too. If we'd worked out this modification a bit earlier we wouldn't have melted the light!A short length of wood at the back stops the runners from sliding backwards since they don't lock.
Extra storage is provided by the shelf that hooks to the channel above the windows but we had to provide a number of bungee loops on it to keep (light) things in place. There's a bungee net across the roof that lets us air the bedding during the day while keeping it out of the way (but not dust free!).

Here's what happens if the kitchen storage isn't fastened down off-road. We thought about catches, clips, bolts or some other way of holding it all together, but opted for the simplicity of a strap in the end. This allowed us to use the bin lids as trays for reading, writing this blog or for eating (DP👍). The gap at the near end is to let me get at the housekeeping stuff - brush, head torches, loo paper and anything else that we didn't want to go digging for when loaded up. This was all kept at the end of the bin.
.
Under the nearside and centre bedboards are two "tall" Wolf boxes. We picked these up at the Adventure Overland show and have never seen 'em since. A pity, because they are exactly the right height to support the bedboards in line with the tops of the storage bins/seat. The little bit of wood under the front edge is a batten that gets the box level and "square" to everything else - a Defender has some very odd angles in it.

- and in the nearside box is one of these gadgets.....
 |
| This photo will appear again in"Daphne Mk3" as the table was the result of doing a design re-think of the single-function bedboards. Everything must do at least 2 jobs.... |
A Cadac grill-cum-BBQ. These really are excellent bits of gear. We've cooked everything from pizza to roast chicken (with all the trimmings) on this and it's great. In fact if we're away from the Midgies it's our preferred method of cooking. We only used the on-board facilities in Morocco, for example, if it was too windy (sand in the stew? No thanks) or cold. The downsides? It needs watching or shelter if it's breezy as the flame tends to blow out and the grill pan can be a pain to clean for those of us spoiled by non-stick cookware. We've just (Mar 2017) bought a non-stick liner for it - we'll review it once we've had the chance to use it.
Then there's the liquids. Refreshments, that is. We tried to do this on a budget at first. Daphne Mk1 had little more than the coolbags available at any High Street Store. These might be fine for taking sarnies to work or bringing the frozen peas home, but useless for our purposes. We bought a very cool-looking - sorry - box clad in aluminium that ran off 12v and was advertised as being able to keep things cool down to "ambient -23 degrees C". It didn't/couldn't. Not only that, it was power hungry and packed up completely one year and a week after we'd bought it. This was, of course, one week after the warranty ran out.


The ally box was useless after it broke down and the Ice Box we sold on when Daphne was being reinvented to Mk3 standard. In the end, we had to spend what for us is serious money to resolve the problem. Buy cheap and buy twice....or 3 times, in our case. Ho Hum.
And that brings us on to the proper way to power the fridge. We had a leisure (auxiliary) battery but it wouldn't fit inside the normal Defender battery box unless I replaced the huge starter battery that was already in there. The solution was to build a box on the floor in front of the centre seat since this was never fitted, and make it the right size that it would support the bedboards. After a failed attempt using a relay recommended by my local caravan shop, we bought one of these:

A Voltage Sensing Relay together with all the bits of cable, fuses and connectors to wire it all in properly. This took a while as I didn't want to make any expensive sparkly mistakes but also make the system easy to maintain and as I'd inevitably find that I'd done something wrong, easy to fix when it broke.
Most systems like this are built into the battery box but, as we knew we'd be changing the seats for ones that didn't have a removable seat cushion we wouldn't have easy access to an arrangement like that. This is what we ended up with:

We built a small box into the side of the battery compartment and reinforced it with angle. Open at the top and bottom, the cabling was easy to route and modify and the fuses were all easy to get at. We protected the system with two big bar fuses before and after the VSR and then led the output through a fuse box to the back of the truck. A cheap "battery condition monitor" from Aldi was hooked up and let us see how the aux battery was doing and check that the VSR was working correctly. Some of these let you know with a loud "clunk" that they've woken up, but the one we chose doesn't make any discernable noise at a volume audible in a Defender, anyway, so we needed a means of checking it was working. This turned out to be quite useful....The cover was held on by velcro and had a circuit diagram stuck to it as I'd inevitably forget what wires did what. One potential downside to this arrangement would be the result of prolonged wading in water that rose above the door sills, but I think we'd have more important things to deal with at that point - like breaking out the lifejackets, perhaps.

Since I'd got the saw out, I did the same on the driver's side and made an alternative access to the box under the seat. Otherwise the space wouldn't be useable with the new seats...

We haven't really talked about the sleeping arrangements in detail yet as these would depend on where we were, whether I was solo, the outside temperature and weather and if we were intending to be static or travelling. We'll cover these options later but enough at the moment to say we've used the inside space as designed and an Oztent, a Decathlon pop-up tent and two different sorts of roof tent and they all have their pros and cons. Next instalment: Daphne Mk3.
Subscribe to:
Posts (Atom)