Well, nothing. We'd just taken the CSW/Camper project as far as we thought we could, and needed a new one. Vehicle and project.
To re-cap on other posts on other forums, Daphne came into our lives in answer to a need to have a vehicle that could support Mike's regular forays to Scotland's west coast on sea kayaking expeditions


For those of you blessed with ignorance of these little creatures, let me explain. It's a fact that some parts of Scotland, although staggeringly beautiful, are empty of the tourist hordes that would turn it into a northern version of Cornwall every summer. Why? It's almost entirely due to these (and windfarms, of course). Now, I can deal with sandflies, mossies, chiggers and scorpions, but midges make life miserable. I'm lucky in that they don't seem to like the taste of me but other's aren't so fortunate. What does get to me is the impossibility of eating, drinking, breathing or blinking without a thousand of these little beasts wanting to join in.
| This is the view from behind the midgie net.... |

| ...and this is the only way to survive them. Unless you have a mobile Hidey-Hole. |
I'm told that they closely resemble the Arctic blackfly in their eating habits, and people in Upper Canada have been known to shoot themselves to escape their attentions...So, Daphne had to fulfil another function other than Boat and Body transport - she had to provide a haven from The Midge. Everything started from there....at this stage we had no intentions of going any further afield than Orkney. We outgrew that pretty quickly and so did Daphne as the initial design concept had to grow up with our travel ambitions.
 |
| A cold wake-up on Skye |
I had an enforced spell in hospital just after we bought her in 2010, so I spent the time sketching out a wishlist:
1. Capable of carrying 4 boats on the roof and thus 3 passengers.
2. Sleeping space/bed for up to 2 people inside. Bug-free ventilation.
3. Able to cook, wash and relax inside. Somewhere cool for beer and warm to sleep. Enough storage space for kitchen stuff, food and tools.
4. Convertible to standard load space quickly.
Now, the seating layout in a CSW 110 Defender does some of that, but because the second-row seats are arranged on a "step" to provide a footwell, the load space behind the front seats isn't flat. This creates problems when trying to design a solution that allows all of the above to be achieved. In the end, we had to create 3 different sets of fittings depending on how we intended to use the truck. More of that later, but where to start? Having messed about for far too long with lots of ideas, in the end I decided to base the designs on 2 things - the dimensions of a Really Useful Box (a tradename - you can get 'em here) and they are a convenient size for lots of uses:


Why a Defender? Well, basically, it's a box. Lots of 90 degree angles, straight lines and flat bits, or close to, that lend themselves very easily to DIY customising. It had to be a 110 since I couldn't lie flat in a 90 and we needed enough room for that - for me at least, and for Sue in extremis - and for cooking and hiding from The Midge. The CSW version is a little more refined than basic Utility models with an insulating (-ish) headlining, lots of windows for good all-round vision and internal light, carpeting and an immobiliser. There are lots of arguments that say that other vehicles are more reliable, comfortable, economical etc etc but frankly nothing comes close to the Defender for "chop-ability". The Toyota family, for instance, offer very popular alternatives but it isn't possible to live in them. Live "off" 'em, yes, but there just isn't the scope for internal conversion that a Defender offers. 'Coz I don't want to get wrapped up in an argument over which "expedition vehicle" is best, that's the last - possibly - that I'll say on that subject. So don't get me started, OK?
So, armed with my sketchpad and a selection of spanners, we set about stripping Daph' of her excess weight. The rear bench seats came out together with the front centre "dicky" seat - the most useless bit of original equipment possible to imagine. At this point, and after a couple of hours swearing and getting skinned knuckles I made the first of a number of Special Tool purchases - an angle grinder and a dozen cutting discs to solve the difficulty of undoing rusted, seized, rounded-off nuts and bolts. Should be included in anyone's budget when considering buying a secondhand Landy...I also bought a Bigger Hammer and a set of decent drill bits.
The second row seats came out while we worked out a way to "have our cake and eat it" in terms of having a bed and seats for 2 in the back. In the end we came up with the following optional fits:
1. All second-row seats out, footwell covered, making a double bed space with coolbox/fridge space on the offside.
 |
| Option 1. Here you can see the footwell "problem". This picture should really belong in the next episode as you'll notice we've changed the front seats - these are from a Volvo. A small strip of steel extends the opening angle of the door. This was long before somebody started selling the same thing at a silly price. Next time I have a good idea - if I ever do- I'll patent it.😒 |
2. Centre second-row seat removed, footwell covered, making a single bed space with 2 seats.
 |
| Option 2. There isn't room to lie down on the seat, but with the floor slats in the upper position and a board across the second row seats, there's just over 6 feet of bedspace available. |
3. Centre and offside seat removed, nearside seat folded forward, footwell covered, making a single bed with coolbox:
 |
Option 3. With the coolbox moved onto a front seat there's enough room for a "cosy" double bed (Option 1). The window blinds are loft insulation foil with velcro tabs as fasteners. |

The picture above shows how Option 2 worked out:
The slats on the floor are shower inserts from Tesco and lift up to be supported by the wooden strips you can see along the sides of the seat and kitchen bins. The Really Useful Boxes, 3 of them, then slide underneath.
The large door under the sink is actually a flap-up table as well.
Water is stored in the 10 litre plastic container on the unit next to the sink, stacked up to save space and held in place by a webbing strap and Fastex buckle.
The Camping Gaz cylinder is stored under the sink since the inlet for the stove was on the right - as you look at it - so this gave a shorter run for the hose. This isn't legal from a "proper" campervan standpoint, so you couldn't describe it as such for licensing purposes, I guess. The LED lights above the cooker ran from the leisure battery. Or they did until heat from the cooker melted them....first Lesson Learned....
 |
| With everything stripped out this is what you have. The heavy duty rubber creates a "bathtub" that prevents any leaks (Wot? A Defender always leaks!) or spills getting to the metal and eating it up. At the front right you can just make out the screw clamps that help to hold the kitchen in place. There was also a bungee that gave tension to the kitchen unit by anchoring it to the side rail. Again, this is an Episode 2 photo (Volvo seats) to illustrate the idea. |
 |
| ...the rear screws |
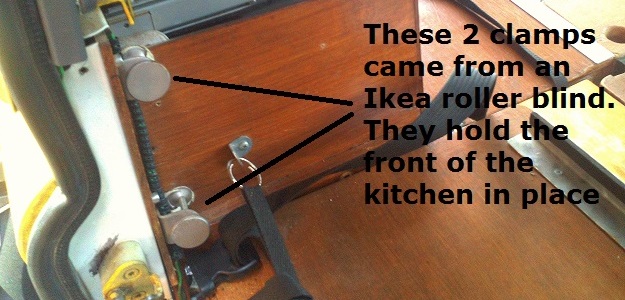 |
| the front clamps.... |

This may look a little sloppy and, yes, it does move about a little bit, just like everything else attached to the chassis that you'd assume was solid. The whole vehicle, including the chassis, flexes a bit when under load particularly when crossing rough ground. We found that bolting everything so that it couldn't move actually created failure points - bolts snapped, screwed joints came apart. We then re-made the connections with a bit of "give" - no more problems. The "athwartships" bracing was provided by the floor slats which stopped the bottoms of the storage bins from spreading out.
The coolbox ran off 12v and for this, together with a couple of lights, we installed a second ("leisure") battery. There wasn't room for it in the standard battery location which was already taken up by a huge Bosch starter cell, so we built a box for it behind the cubby box, on the floor. Not ideal, but it worked. Unfortunately, the DIY lash-up of a split charge system didn't, so we added that to the list of What To Do Better Next Time.
 |
| Oh, and a bit of bling for the office. The CD radio is mounted over the hole where the ashtray used to be - somewhere for the wires to come out - and in the original mounting tray except it's upside down. Was going to chuck it away but have you seen how much those things cost? Ought to be made of gold at that price. |
No comments:
Post a Comment