A "shakedown trip". That's what we needed to prove that all the modifications and innovations would actually work.

They say that "no plan survives contact with the enemy", and the enemy in our case was going to be the reality of living off-grid for a few days at a time. We also wanted to continue experiments with tents and made up our own temporary roof-top-tent:

You'll recognise this from an earlier post, perhaps. To set this up we made some boards for the rack that gave some support to the floor and also doubled as traction/sand ladders.
We had some ripstop nylon from an old flysheet and a couple of long fibreglass poles and these were used to cobble together an "entrance porch".

This worked very well in terms of providing shelter to the door. If it weren't there the angle of the pop-up's door wouldn't keep the rain off the bedding. As there wasn't much room in the tent to dress etc we felt we needed to open the entrance to do this comfortably so the entrance would need some cover.
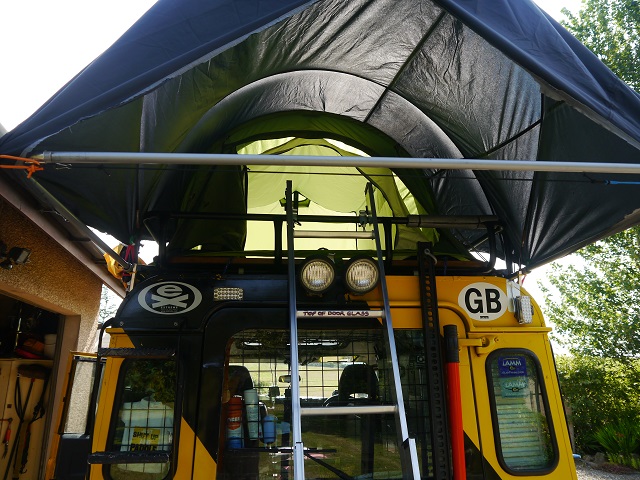 This was the result. You can see that we've used the shower curtain support to tension the end of the porch and a cheap loft ladder to get up there since it needed a lot of acrobatics to use the rack ladder to get in. The front end of the sheet was tensioned to the front of the rack using bungees and then stretched over the pop-up's roof and down to the back.
The fibreglass poles were bent into arches and fed into aluminium tubes fixed to the rack at the appropriate angles....

By the end of 2 weeks we'd used the system 4 times. One of the fibreglass poles broke as the curve it was forced to take was too much for it. The mattress was 2 foam fold-up sleep-over pads from Aldi which we'd used in the Oz-tent. As I said in a previous post these take up a lot of room. We tried to store them on the roof but the time it took to get them into large plastic bags and then make these weatherproof was too long and didn't give them chance to air properly. To avoid having to sleep on damp foam we ended up with them in the back - and in the way, most of the time. This was something we'd not forecast and suggested a future problem with an RTT where it wouldn't be so easy to get the mattress out and dry it if it got damp. We were proved right when Sue left the tent door of our RTT open one night in Morocco and it rained. It took 4 days to dry out the bed....but you can read about that in last year's (2016's) diary.
We also troop-trialled some more additions to Daphne's storage. There's a lot of wasted space in and around the Defender, some of it under the wheel arches and floor. We thought we could make use of some of this to store things that would need to be easily accessible and /or smelly/messy if kept inside. Things like spare gas bottles, fuel, oil, grease and anything else that wouldn't be too affected by a little water or mud.
 |
| First, cut your hole. After spending 2 weeks measuring it again, and again, and again... |
 |
| then bolt in your box and camouflage it with some paint |
 |
| then fill it with stuff to show how pleased you are that it actually worked. |
This little box was marketed as a deck storage compartment on a yacht although we saw others slightly smaller for sale on dedicated "landrover" sites for a lot more than we paid for this. It's not quite small enough to go into the space "square-on" but by tilting it a little and trimming a small piece off the mudguard it can be made to fit. We thought we could stand the "off-square" look for the benefit of lower cost and greater volume. The catches are lockable and, even though it's only plastic, it's extremely durable, watertight and secure. In Morocco last year one of the catches jammed when something shifted inside the box and the lid resisted all attempts to prise it open. Of course, nothing will resist a determined attack, with a jemmy or a mallet in this case, but it's good enough for normal use. We eventually used it for carrying emergency kit - the air compressor, hose and inflator, 2 folding axle stands and a bottle jack. Oh, and 4 folding chocks. And the tyre deflators. With some space to spare.
The area under the footwells just cries out to be made more use of. Mike found that 2 old drill cases were the perfect fit, supported by the outriggers:
 These were filled with bottles of oils, brake fluid, Radweld, grease - all the stuff that you'd not want to leak inside the truck and make a mess. We finally used 2 bungees to hold each in place and never lost anything. The levelling chocks also went underneath although these suffered a bit during some really rocky transits. The chocks slid neatly between the chassis rails and the horizontal stay for the side steps that we put on so I could get in and out more easily. Mike modified the fixing so these could be used with the rock sliders. Unfortunately these steps aren't ideal for rough tracks with large boulders and suffered a bit. In fact one of them got so badly mangled we just took it off completely before it fell off.
Inside the front wings there's lots of empty space which is easy to get to.

We made a hinge for the dummy air intake on top of the OS wing and lined the space underneath with a sausage-shaped zip-up bag contained within chicken wire mesh. This was used to store lashing straps, bungees and other tie-down kit. The hinged flap had a lockable catch. The other wing space is the real air intake for the heater so space wasn't so abundant, but we managed to store a back-up foot pump and a complete set of coolant hoses there. If you look around there are a lot of other little nooks and crannies that can be made use of - for instance our ready-use engine oil was kept alongside the brake servo.

There were a few other little bits and pieces that we thought might be a Good Idea. Take the extra lights, for instance:
 |
| For those of you who think that the small foglights are just "bling", they were ideal for illuminating the ground very close to the front wheels, unlike the spots which were there for long range use. By contrast, the winch was never used but everybody has one...right? |
The spots - long range driving lamps - worked well enough but because of the UK regulations could only be used when the "fullbeam" lights were on and had to be "off" on dipped beam. This made them useless for giving us a better view of the road under normal conditions if there was other traffic around. The smaller fogs were an addition to light up the ground close to the front of the vehicle. Our expeditions to our local pine forests to collect firewood made these very useful as they allowed us to see the ground 3 or 4 feet in front and to the side of us which would otherwise be in darkness. The hole you'll fall into needs to be seen if you don't want to bury yourself in it, right?
When we set Daphne up for Morocco we took all these off. They are only any use if you intend to drive at night. Having read all the warnings about Moroccan traffic we decided we weren't going to so we didn't need them. They never went back on but were included as an accessory for the new owners. They also got in the way of the "dead lift" of the bonnet. Because it's very heavy with the spare on the engine lid, Mike needs to get hands underneath the front edge to push up from a squat. This is difficult to do if there's anything forward of the grille at the critical height.
The light guards might look as if they're a bit unnecessary but as we have a lot of game birds around the back roads that continually commit suicide by flying head-on into Daphne's front end, we thought they'd be useful. And so it was - one particularly stupid pheasant hit the offside headlight square on, or would have if the wire guard hadn't been there. The guard was bent right in and the top of the wing forced back a few mm. If it hadn't been there we reckon we'd have lost the headlight, the indicator and sidelight, the plastic surround and a load of cash to replace them, not mention the cost of the panel beating for the dent in the wing. The bit of roadkill for supper wouldn't have made up for it...

We needed somewhere to store the Hi-Lift jack so made up a couple of brackets. The top one seen here was part of a commercial kit while the bottom was a mounting plate for a TV aerial, modified with a padlock and locator pin. Worked a treat, cost pennies. Later we made a cover for the jack's vital parts from an old inner tube; not totally weatherproof but good enough to keep the worst of the crud off it.
Bush cables. Why? Not only do they actually work quite well as we found in some of the more overgrown parts of the Alpine trip, they also provide a useful handrail when climbing onto the roof. With a lot of kit (and eventually a roof tent) blocking access from the rear then the only way onto the rack was over the bonnet. The spare wheel provided enough of a step to do this fairly easily but the journey from front bumper to the roof and back was made much easier and safer with something to grab onto. Later, in Morocco, we found another use for them as drying racks and washing lines.
Rock sliders. The original sills were past their best and we'd tried to re-invent some old-fashioned running boards to give easier access to the cab. While these worked they looked a little odd - made, as they were, from lengths of decking left over from a garden project. Mike found some rock sliders advertised in one of the Landy magazines, made to order near Northallerton, Yorkshire at a price well below the usual. These were well made but the powdercoated paint finish was total rubbish and they began to rust through within a month or so - almost as if the metal was corroded in the first place. A lot of unnecessary extra effort went into trying to sort this out, which once the rust has started is very difficult to stop. Nevertheless, they proved their value on a couple of occasions so a good investment despite the corrosion.
Wouldn't go back to this manufacturer, though - a thoroughly unpleasant individual.
Jerry can storage. These are something else we didn't want inside or on top.

 |
| Jerrycan racks. The mast steps were useful for roof rack access. |
They survived the Alps trip and two expeditions to Morocco so we're quite pleased with them. Our Tour guide in the Alps was equally pleased we had them when he ran out of fuel at the top of the highest road in Europe. Not sure that they're strictly legal in the UK but no-one's ever complained.
Once the Alps trip was over, we decided several things:
1. We quite liked roof tents for touring if the ground wasn't fit for a tent even though that would be our preferred option.
2. Very little needed changing although after the first Morocco trip we'd take a second spare wheel which required a wheel carrier on the back, and the awning wasn't really up to anything more than keeping the sun off the wine.
3. We didn't like driving in other people's dust cloud and working to a schedule. I guess the latter is unavoidable and part of the deal on that kind of trip, but the former meant we were often hanging back to keep out of the murk and lost a lot of photo opportunities as a result - not wanting to hold the group up or lose them at the next turn.
So, having digested the lessons, within a few months we bought this:

A "Chinese Knock-Off" of a popular design, imported by a UK company based near Derby. A very good price compared to the usual competition. Here's our review:
Pros - a LOT cheaper than most of the rivals of the same dimensions. The porch can be left attached when folded and it's almost 20 kg lighter. This is because of the...
Cons - nylon instead of canvas so not as hard wearing and more condensation to deal with. Noisy in a breeze. Zips of dubious quality. Mattress about 2/3rds thickness of the top brands. Side skirt "ground floor room" won't reach the ground from a Defender roof height and the groundsheet is therefore going to have a gap to close. The transit cover was far too tight to allow the zips to survive normal use but it was deep enough to cover the tent and be secured with straps over the top.
The tent arrived with minor damage to the base and we negotiated a discount for that. The groundsheet was supposed to be supplied with an extension panel to cater for the increased height of our rig - we bought the ladder extension to solve the entry problem but the promised groundsheet extension was never made available. In the end we had one locally made and the importer paid the bill, so top marks for product support. They also supplied a replacement cover when the zip broke and a replacement pole for the awning - see below - all at no charge.
On balance, this was a good buy and apart from some problems with zips it performed very well. We made a false ceiling inside from an old cotton bedsheet. This caught a lot of the condensation which anyway wasn't excessive most of the time and provided the window vents were open wasn't really noticeable in warmer climes.
One thing that was a surprise, though, was the often-quoted "good reason" for having a roof tent: "You can leave the bedding, and everything inside and it's ready to climb into at the end of the day". Yes, if you don't mind sleeping in damp - and getting damper every night - duvets or sleeping bags. No matter how little condensation we suffered inside the tent the things we slept in and under would need airing. Even then if we folded them away with the tent they'd be unpleasant to sleep in. The first job every morning was to get it all out and hang it over the bush cables or open doors to get properly dry.

We replaced the home-made awning with one of these from the same source as the tent:

...or rather, something that looked very much like it.

Looking at the website it appears that these are no longer available. A problem with product patent, perhaps? We suggest this because it had a striking resemblance to another product from a well-known manufacturer but at less than a quarter of the price. The shelter it gave to the back and sides was outstanding and it took very little time to deploy. Mike got the impression that the importer hadn't really had a close look at it, had never used it and couldn't explain how some of the features worked so we found out ourselves by experiment. For example, rainwater would pool in the middle of the wing sections unless one threaded some cord through the tubular "pockets" along the outside edge and this gave a nice straight edge - a gutter - to the awning. This would allow water to run off if the middle of the gutter were either tied down or, as we did, a small stone used to weight it. The alternative would've been to rig the outside edges higher than the inner so water would run back towards the vehicle as the set-up above seems to suggest. Our awning lacked the "elephant's trunk" to allow this to happen neatly and anyway, who wants a puddle just there?
The telescopic locking poles could be a bit awkward to operate but once in place they were sturdy enough to support a windbreak which we made to fit. This would give us an enclosed eating and cooking area which, given the desert winds we experienced in 2016, is well worth making.
The Frontier stove was an impulse buy.
 Yep, we admit it, it seemed like a Good Idea At The Time. The chimney sections went together like the legs of a Flowerpot Man and the damn thing is a nuisance to keep alight whatever you choose to burn. About the only thing we found would produce heat rather than smoke and not need constant attention was camel dung. Difficult to find in someplaces, though 😎. We replaced the chimney with a length of flexible exhaust tube and this allowed us to direct the smoke out of the awning and still keep the stove somewhere useful. You can buy a bent section to do this but it cost more than it could possibly be worth and wasn't so easy to use - the double bend allowed it to swivel about with obvious problems arising from that. The new chimney strapped to the side of the roof rack for travel. About all we can say for this stove is that it could keep a kettle on the go and save a little gas but to keep us warm on those cold desert nights?. .....a fleece jacket is 1/20th of the weight and easier to pack. Doesn't get you in trouble with the neighbours, either.
Well, that's a long post. We thought about adding a couple of lists of the spares we carried (to Morocco) and where we stored it all but unless we get a request for these then it ain't worth the effort.
Next time, we can return to Daphne's successor - and the saga that goes with it.
On balance, this was a good buy and apart from some problems with zips it performed very well. We made a false ceiling inside from an old cotton bedsheet. This caught a lot of the condensation which anyway wasn't excessive most of the time and provided the window vents were open wasn't really noticeable in warmer climes.
One thing that was a surprise, though, was the often-quoted "good reason" for having a roof tent: "You can leave the bedding, and everything inside and it's ready to climb into at the end of the day". Yes, if you don't mind sleeping in damp - and getting damper every night - duvets or sleeping bags. No matter how little condensation we suffered inside the tent the things we slept in and under would need airing. Even then if we folded them away with the tent they'd be unpleasant to sleep in. The first job every morning was to get it all out and hang it over the bush cables or open doors to get properly dry.

We replaced the home-made awning with one of these from the same source as the tent:

...or rather, something that looked very much like it.

Looking at the website it appears that these are no longer available. A problem with product patent, perhaps? We suggest this because it had a striking resemblance to another product from a well-known manufacturer but at less than a quarter of the price. The shelter it gave to the back and sides was outstanding and it took very little time to deploy. Mike got the impression that the importer hadn't really had a close look at it, had never used it and couldn't explain how some of the features worked so we found out ourselves by experiment. For example, rainwater would pool in the middle of the wing sections unless one threaded some cord through the tubular "pockets" along the outside edge and this gave a nice straight edge - a gutter - to the awning. This would allow water to run off if the middle of the gutter were either tied down or, as we did, a small stone used to weight it. The alternative would've been to rig the outside edges higher than the inner so water would run back towards the vehicle as the set-up above seems to suggest. Our awning lacked the "elephant's trunk" to allow this to happen neatly and anyway, who wants a puddle just there?
 |
| This is half of the windbreak - and a very clever chair from FrontRunner |
The telescopic locking poles could be a bit awkward to operate but once in place they were sturdy enough to support a windbreak which we made to fit. This would give us an enclosed eating and cooking area which, given the desert winds we experienced in 2016, is well worth making.
The Frontier stove was an impulse buy.

Well, that's a long post. We thought about adding a couple of lists of the spares we carried (to Morocco) and where we stored it all but unless we get a request for these then it ain't worth the effort.
Next time, we can return to Daphne's successor - and the saga that goes with it.
No comments:
Post a Comment