Monday, 26 February 2018

Keeping it legal.


With the annual MoT test due when we return from our travels, I've been doing some reading on the new regulations and discovered - and this isn't a new thing in the rules - that Elly is technically unroadworthy. This actually isn't a part of the MoT tester's check, but it is the law. Odd - you'd think they would agree with each other but apparently I can leave the Test Centre with a valid certificate and get nicked 10 metres down the road by an observant policeman with a tape measure. The reason for this is that the tyres protrude too far from the bodywork. The rules say that no part of the tyre that contacts the road should protrude beyond the edge of the body, which includes any wheel arch extensions. Which I've got, but they don't extend far enough:


This is the same wheel and tyre combination we've had fitted before, but when fitted to Daphne we didn't have the wheel spacers that Elly has got. Opinions vary on the usefulness of these but we decided to keep them and try them out. They're supposed to give a better turning circle, which for a Defender can't ever be a Bad Thing since they have the directional manoeuvrability of an ocean liner.
Anyway, the spacers are 30mm wide, which gives us the problem you can see here. The standard Defender wheel arch extension isn't deep enough.


The solution most people go for is something like this:


These bits of ugly plastic do the job but are a bit macho. They're fixed on with battleship-style bolts and screws which collect crud and rust. They give the vehicle a bit of a "military" look, which we don't want. And they're very expensive.


Searching around for a DIY solution it occurred to us that the design in the picture at left was, basically, the original "eyebrow" with a bit added to the back to make it stick out more. What if I added a bit, but to the front edge?
We thought about various bits of flexible or mouldable material like rubber, plastic, fibreglass or thin aluminium. None of these had a reliable means of fixing to the eyebrows at the right angle - there isn't much of a "lip" to hold a clip so whatever we used would have to be screwed and/or glued in place.

With a bit of lateral thinking, we came up with this:


This is from Screwfix and is sold as industrial door seal. The retainer is aluminium and the bit that does the sealing is a rubber-like strip. The whole thing is semi-flexible and you get 2 pieces each 1250mm long for £16. This is enough for 2 wheel arches. The only problem is they're straight and need to be curved. This requires patience and a bit of thought but, with care, you can get a pretty effective result:

1. Assemble the strip and the retainer, drill some extra mounting holes about 4mm diameter. Having marked a datum point on the arch and the seal, work from one end to the other, gently forming a bend in the aluminium. I used Bulldog (paper) clamps and spring clips to hold it in place as I went along. I did the first one but bent the aluminium first. It was easy but then trying to slide the black "rubber" bit into the now distorted channel was, shall we say, a bit of a test.

2. Eventually you'll end up with something like this.


3. Once the basic shape is formed then clamp it in place and mark the cut points at the ends. Given that the original eyebrows are very flexible - and mine bowed in the middle too - you need to be quite accurate with this final trial fitting. You can see how much things need to be pulled together:


4. Mark the correct length then remove the new extension. I intended to cut the ends to follow the line of the original arch. It looks a bit neater and more "finished". Don't cut it yet, though, in case you need to adjust the position of anything as you make the final fix. This is just to put the holes for the end fixing screws in the right place as it's easier to do on the bench:


This is the rear end of the driver's side

5. With everything secured as best you can, drill through the holes for the fixing screws. Choose your drill size very carefully for the size of screw you'll be using. I drilled 1mm undersize for the stainless steel screws I was using, and tested to make sure it wasn't loose or so tight I'd crack the eyebrow lip - it isn't very thick. Do one at a time and put the screw in before drilling the next one. The lip on the eyebrow is also very narrow so accuracy is needed here. Remember to make sure the top edges butt against each other as the tension in the eyebrow works against this. You may have to jack the bodywork up to give room to get the drill under the arch. The alternative is to remove the wheel, of course, but this makes for a much longer job. It was cold, so I didn't do that. Lazy!


6. Once all the fixings are in place, take it off again and trim the ends to the profile you've chosen:


7. Do a final test fit and once you're happy, apply some of this stuff - or something similar - to the back of the aluminium strip:

I did a trial the night before the final fitting just to check it would stick and it took quite a pull to get the test piece off, so it'll do for what we need it to do.
8. Then fit it all together again, tightening the screws in order. It'll help to have someone support the new piece as you work along the edge otherwise the glue will get onto everything you don't want it to.


I'll probably trim the forward edge to a more streamlined shape, but at the moment it seems about right.

 ..and this is what you end up with. Not really heavy-duty but good enough for us. It makes Elly road-legal now and for £32 and a couple of hours work, not a bad solution. Not only that, but the bodywork now stays cleaner since a lot of the muck that the unprotected tyres threw up is caught and prevented from hitting the bodywork. If it doesn't stand the test of desert travel we haven't lost much and we'll probably do what everyone else does and shell out for those ugly, pumped up things. Or take the spacers off....


"You f*cked up, you trusted us"

Anyone remember Animal House ? The reason for the question might be clearer in a minute.


Mech Prep continues. Fettling and fine tuning, or just generally faffing about, I suppose. All the little jobs that still need to be done seem to be multiplying the closer to departure we get. For instance having changed the wheels and tyres to the "desert spec" we decided that they needed to be properly balanced, and with a tiny bit of wheel shimmy evident again the whole setup could benefit from having the wheel alignment checked. Sandy at IWL doesn't have the full kit so Elly went to one of our local tyre fitters - big national chain - to have it done. This was a mistake. I trusted them. I therefore "f*cked up".
With the work done I drove 5 miles home with no issues, but the following day, driving around, the wheel wobble and vibration through the steering wheel was horrendous. I had to stop 3 times as the shimmy wouldn't stop on deceleration and was so violent I thought something was going to snap. Getting home, I got underneath to have a look. What I saw didn't impress me one bit.


The track rod had been heated around the pinch bolts enough to burn off the paint and melt the nylon in the self-locking nuts, which hadn't been replaced. Evidence of this kind of heat treatment on a steering component is an MoT failure. Elly went back to the Big National Chain for an investigation.


The results of the discussion I had with the manager were positive - he agreed to re-check the wheel alignment - but not until I'd made my disappointment clear regarding the workmanship of his staff, who in turn suggested that if the tracking was out then I "must've hit something".
"Not yet, but I might", I thought, but let it go - for the moment, at least.

My complaint about the heat-treating of the track rod was brushed aside until I pointed out how the clamps are supposed to be released, and I had to insist that new nuts were used to finish the job. The MoT rules state that if the locking nuts etc are missing or damaged then the car won't pass the test. I pointed out to Mr Manager that NyLoc nuts will only "Loc" when the "Ny" is present, not dripping out of the nut like wax. Then it's just a "nut", and worse than useless on a steering component. Since none of these were available, I'd have to go back again to have the job completed safely - for now, at least. I could do it myself, of course, but there's more to be discussed - the question of the track rod damage has yet to be sorted out. As the place is also an MoT test centre then the standard of their work in that area has got to be questioned:


After all that, there's still a horrible vibration which is proving difficult to track down. Everything in the steering linkage, wheel bearings, swivels and track rod ends seemed tight with no play, knocking noises or rumbles, so I was getting a bit desperate for new ideas. I'm off to foreign parts next week for 3 weeks, leaving little time to sort the problem out when I get back. I need to find a solution pretty soon.


In desperation I changed all the tyres around to try to get back to a position we were in a week ago, which was with no - or very little - problem. An hour to swap them all around, a test drive...well, it wasn't a long test. Within a few hundred metres it was clear that the problem was still there and as bad as ever. Back to the driveway and put all the wheels back to where they'd been an hour previously.


Time to get help. With all my previous checks done by just swinging like a monkey on everything underneath that I could get hold of, I decided to try a different attack direction. Sue got in and with the engine running (to power up the steering) she moved the steering wheel to and fro while I lay underneath, tried not to get anything soft caught in anything moving, and watched what happened. Initially it looked like everything was moving the way it should, but as I got more interested it was clear that, with the steering now mobile instead of static there were 2 places that weren't moving the way they should. One was the joint on the steering drop arm. This wasn't moving smoothly and has a definite dead spot in it, together with a "click" that I can feel. This needs to be changed even though the play, if that's what it is, is tiny. It'll only get worse. The other problem was obvious now everything was moving. Remember the Panhard rod bushes that we changed in November? This is the remains of the bush at the chassis end...


The clue was a bit of shredded rubber poking out of the joint. With a bit more energetic movement of the steering wheel the movement got so bad it was clear that the bush had completely disintegrated. I think this is the one that I fitted before buggering up the other one and have Sandy finish the job so I'll have to dig the invoice out and find out where I bought it - and not buy another from the same source.This is probably why the tracking has been out, then adjusted, then out again. It would depend on the position of the axle when the readings are taken. The system is supposed to account for that by the wheels being rotated through 90 degrees for a second reading. This takes care of any variables such as bent rims. They didn't do this.

I took the bash plate off to get a better look at the front track rod and first of all found another buggered nut:

Look carefully and you'll see that the nut is empty of the Ny that provides the Loc.
 and the rod looked as if it'd been barbequed. The problem here - and any knowledgeable metal workers can skip this bit -  is that steel has a temper chosen for the situation in which it'll be used. Some stuff is so hard it'll shatter if you hit it, other kinds are ductile so they'll bend under load to form nice shapes. The latter condition can be induced by heating the metal and allowing it to cool slowly. Like here. Only problem is that this softening of the metal in the steering rod isn't a good idea. Who wants a floppy rod? Anyway, moving on...
The excuse for the heat - once I'd reminded them that it was they that had done it - was that the track rods wouldn't adjust because the threads were rusty. When I suggested that they should use the approved Landrover technique for freeing them the response was "we don't have much to do with 4x4s". They're happy to take my money and press on in ignorance, though.

Peering down the steering damper, this was hard to miss now I had a clearer view:


The pinch bolt on the track rod has been turned so it presses hard against the damper, leaving a bright metal score across it. The score has been caused by the bolt moving left and right across the metal skin as the steering wheel is turned. It's so bad that it's forced the steering drop arm (Landroverspeak for the bit that connects the steering column to the wheels) out of alignment. The only way to get full right steering is for the bolt to force the damper out of the way. Not good.

Altogether, a bit of a horror story. The return visit to the tyre place wasn't successful in terms of getting the new nuts. They "hadn't been able to find any" even though a Landrover main dealer for the area is 200 metres away. We, the manager and I, had a quiet conversation and he's agreed to reimburse the cost of replacement track rods and retainers and re-do the wheel alignment...all I have to do is get the parts here before next Saturday.

I replaced the Panhard rod bush with one from a Polybush kit that I had in the bottom of the spares box. If I'd remembered that they were there I'd probably have used them when we did the job last year, but I used rubber ones instead. The idea was to put the Polybushes into the spares box for the trip since they're "easy to replace in the field".

Well, the split - that is, two-part ones - might be. The one piece versions? Not a chance. Despite trying my best with the big vice and various sizes of sockets I couldn't get it to go in, so it was back to Sandy and his expert workshop to sort it. The result, now that it's back on the truck, is the complete absence of any steering wobble! Hurrah! Sandy's solution to fitting it was to soak it in boiling water for 5 minutes. Why didn't I think of that instead of lathering it with more lube than an inflatable sheep?
So, I needn't have ordered the new steering damper, the new bushes, the new drop arm ball joint kit...Oh well,they all need replacing anyway, probably, so I might as well get on with it and prevent problems in the near future. The new damper only took minutes to fit and wasn't expensive, and the ball joint can wait until next week when I have to take the steering linkage apart anyway.

Overall, a busy few days. A few lessons learned and, best of all, the smooth ride restored.

Monday, 5 February 2018

Clock's ticking....

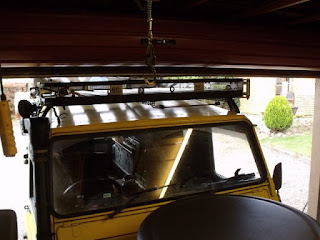
Time to get stuck in to the work we need to get done before the end of the month. I have to be away for over 3 weeks in March and with the departure planned for early April we need to get ourselves sorted out. By removing the CB aerial I was able to get Elly's front end far enough into the workshop to protect me from the howling gale and driving rain that always seems to be a feature of working on anything nowadays. At least I can shelter behind the truck for at least half of the job if the wind direction is right.


 But, as you can see, there's not a lot of room to spare. Certainly, if I want to jack the front end up then I have to be aware of how little room there is! Doing the same with the back end isn't possible because of the roof tent.


New windscreen wipers were a necessity after driving against the seasonal low - and blinding - sun a couple of weeks back. With the screenwash freezing on the glass and the wipers like toothbrushes I had to resort to a sponge and a puddle to see where we were going.


The second job last weekend was to sort out the brakes. I doubt, from the colour of it, that the brake fluid has been changed in quite a while...


...and while I was at it I decided to check the wheel bearings, swap the wheels and tyres for our "desert" ones and replace the rear brake pads. As usual, this became a much more involved set of jobs than I'd planned. First of all the parts I ordered took an age to arrive after the supplier declared some things were "out of stock" despite saying the opposite when I placed the order. Then the courier delivered everything to the wrong address and I had to spend 2 days tracking it down. I know that it's not my responsibility, but if you don't help yourself, nobody else seems to give a toss. Then I opened the box....


Anyone reading this that does their own maintenance knows the reputation of the "Blue Box Bits". Had I known what I was going to get I wouldn't have ordered, but the ad didn't make it too clear, or maybe I didn't read it carefully enough. Anyway, having waited nearly 2 weeks for the stuff I needed to get on with the job. I can see myself replacing the pads sooner rather than later, though. The fitting kit that I ordered seemed OK with all the new bits - retainer pins, springs and split pins.... 


First stage, then, is to get the wheels off. Now, having had the wheels balanced a while ago I hadn't tried to take them off since. The usual tools had no effect on the nuts whatsoever - they were seriously tight; so much so that I managed to bend the Landrover-original wheelbrace.


It should be the shape of the one on the top. A good job I discovered it now as to have this problem with wheel nuts while at the side of the road wouldn't be too great. It took an impact socket and a 5 foot lever to get the buggers off.


Stripping the hubs back to the bearings is easy enough and the front wheels had a tiny bit of play that I felt needed to be taken out. Sandy at the garage suggested that a "tiny bit" of play is OK, but what's a "tiny bit"? I decided to set the bearings again with the torque from the manual and see what happens. I replaced the drive flanges while I was at it, since these seem to wear out quite quickly. 


Getting the wheel spacers off was quite easy  -I was expecting a fight - and the front drive flange bolts had been replaced with some with socket heads. I was a bit worried that if these "rounded" when I put the key in, I'd have more trouble getting them off than if they were the standard hex bolts, but they came out really easily despite being coated with more Loctite than they really needed.


It took a lot of work with taps and dies to get it all off and clean the holes.


Difficult, but if you look closely you can see the difference in the shape of the "teeth" on the flange and the space between them - the new one's on the top. On "Daphne" I replaced them with heavy-duty items but never felt totally convinced that this is the right thing to do. The flanges are a sacrificial item and a bit easier to change than a halfshaft, certainly easier to carry spare flanges than spare shafts. If the flanges are stronger the next item in the chain to wear out would be the splines on the halfshaft....I think I'll stick to carrying spare flanges.


With all that done  it was time to replace the brake fluid. I used one of these to make the job "easier"....which equals not needing any help. 


This is a Gunson "Eezibleed". You fill it with brake fluid and pressurise it with a spare tyre, the idea being that as you take fluid out at the caliper it gets replaced automatically at the reservoir so removing the need for a helper to pump the brake pedal to achieve the same result. And it works....but only for the front brakes - the ones closest to the master cylinder. I had no joy at all with the rear brakes despite pumping the "system" up to over 30psi - the maximum advisable is 20 - and taking the risk of something bursting and spraying brake fluid all over the place. In the end I gave up and The Sorcerer's Apprentice had to be dragged out of the kitchen to assist.


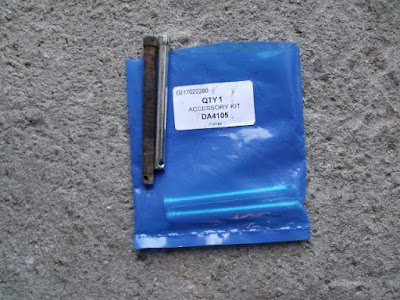
Then it was time to replace the rear brake pads. An easy job, takes mere minutes, and we've got all new parts, right, so no scratching around for replacement split pins and all that....Now, you'll recall my wariness of the "Blue Box" contents? Here's a typical problem:


The new retaining pins are shorter than the old ones. The part number is supposed to be the same as the ones I'm replacing. The result is..... 


....the new ones are too short and the split pin that holds the whole lot together won't fit. Britpart, AKA "Sh*tpart" to many people. I had to reuse the old ones. Nice new springs, though.

Finally, on with the new boots. Shiny wheels, too. Good to go.


Finally, the annual MoT test will be due when we get back, and the rules have changed so that any removal of emission regulators etc will mean Elly not getting a "pass". Since the PO had removed the EGR regulator - and I did the same on Daphne since they do nothing but gum the system up with old oil - this bit of the engine needed to be replaced. A search of the internet revealed that the cost of these things is enormous, and added to that all the bits of hose, solenoid etc needed to put everything back was even more expensive. Given that most people would've thrown the parts away after removing them years ago, there is probably going to be a lot of folk searching for cheap bits from scrapyards across the country. I reckon, anyway, so I picked up some stuff from eBay to refit. Might be a waste of money but maybe not. Anyone want to bet?