Saturday, 31 March 2018

Loading the cargo, packing the bags.

Time's getting short, less than 2 weeks to go and Sue's continuing to fill Elly with the things we need for the "kitchen". This is easily achieved, it seems to me, by taking the cutlery drawer out of the house and tipping it into the back of the truck....Same for pots 'n pans - just empty one cupboard into another, simples!


 I'm just kidding, of course. I know that every item has been carefully considered for its usefulness, weight and ability to do at least 2 jobs...then thrown in anyway 'cos you never know when you might need it. 😉

OK, OK, I am really joking. Honest. We've done this enough times now to know exactly what we need, so The Head Chef has been busy filling Elly's cargo hold with all of the essentials for comfortable living. These are not only things to cook in and with, but essential stores that make life a bit less spartan than Landrover Living might suggest it could be.

Most of this stuff is hidden away for a "Rainy Day" - for that read Blowin' a Hooligan  -when we need something to eat but haven't been near a grocery store for a week or so or it's too hot to cook with the hatches battened down. Most of it's edible with the minimum of preparation and, if it were me eating it without the benefit of Sue's expertise, would be an adequate if uninspiring meal. Fuel, basically. However, with some imagination and skill -which I don't have in the kitchen - these basic ingredients are transformed into something really tasty by Herself. My philosophy where "emergency rations" is concerned is that they should be as unappetising as possible to stop me eating them unless I have to. But, as they say in all the Survival Schools,"any fool can be uncomfortable" so luckily I have someone around who can conjure a gastronomic silk purse from a sow's ear.

We're now getting to grips with all the little jobs that've been waiting for some warmer weather to be done. The water storage has been carrying a solution of baby-bottle cleaner around for a week and I hope all the pipework, pumps and tank are now properly sluiced with clean and sterile contents. This couldn't be done earlier as it'd probably have frozen and split the tank, if not worse. Having messed about with ways of filling it, the addition of a breather and a filler funnel has finally overcome the difficulty of getting water from the outside to the inside without spilling it everywhere.

I had hoped to just fill the tank directly from the water bottles bought from shops but it spits back and slops everywhere. The funnel stops this. The bit of bent wire holds it in place so I can fill the tank single-handed from a jerrycan if I have to. We can still fill it with the normal campsite tap, but the necessary hose is something else to carry that won't have a lot of use on this trip. But...I'm still not convinced that having all the drinking water in one place is a good idea. As insurance, we're taking the small 10 litre plastic container we bought last year at the HUBB meet. If we don't use it for drinking water it'll sit on the roof during the day wrapped in a black bin bag. With luck and some sunshine it will have warmed up nicely for a shower when we stop for the night, but if necessary it'll provide safe water until we can get more, and because it'd be already warm it'll save on gas when we make the tea....think positive!

Elly is now all "blinged-up" with all the toys we like to take on holiday to the beach.


 All the stuff that doesn't like to be bolted on over the winter has been re-installed together with the Soft Furnishings, electricky gizmos, full gas bottles and cuddly elephants. We're not taking the woodstove; hopefully it'll be a bit warmer north of the Atlas in mid-April than we've experienced before in March. This also saves the weight of the flue and the fuel to make it work. I reckon we can always light a traitional campfire if we want the Cosy Factor. 
I've decided not to take the portable compressor either. We'll trust that the one built into the winch will do the job but we'll probably have a foot pump as a backup, not that I'd welcome bringing four 265 tyres up to road pressure with one of these:

A lot of effort, not to mention having to dig it out of the sand every 5 minutes. The only "luxury item" is a shortened ex-loft ladder. This is a skip rescue and will make it easier for Sue to help with the tent cover straps. The alternative is to climb onto whatever is available and try to undo buckles with one hand, the other being used to stay upright. Since it weighs about the same as a bottle of wine, I reckon it's a good swap...I might think differently in Smara in a few weeks.


Now there's the paperwork. Not just passports, medical insurance cards, driving permits, customs and immigration forms, fiches, ferry tickets, money and insurances but all the other stuff for navigation and just getting about in Morocco and Spain. We have phrase books in French and Spanish as well as Darija, so we can make a reasonable attempt at conversation in most places we'll go. The Moroccan Darija dialect (or language?) especially has been a real problem to research. Despite some local help to polish our vowel sounds it seems that every You-tube "How to Speak Moroccan" site pronounces vital phrases differently. Given that Arabic isn't the easiest of languages to master, this has been frustrating and time consuming and may turn out to be a waste of time given the blank looks we got last time. However, once again we'll inflict our bad pronunciation on the locals and hope they'll listen a bit more carefully! At least, it gives us the Moral High Ground  - we'll not be behaving like the Typical (British) Pith-Helmet-and-Fly-Whisk Tourist and just talk BBC in a louder voice. Not all the time, anyway.

A little something to pass the time on the ferry.
There's also those last minute bits of personal gear that always seem to appear out of nowhere for the Loadmaster to find room for. For instance, there's the stuff we need for the 2 overnight stops we have to make as we head for Plymouth. Here's our overnight kit:


Mike's on the right...Sue's on the left....


A few months ago we passed the word around that we we going to try to take some small First Aid kits to distribute to some of the more remote communities in the south of the country. This is as a result of several requests from people we've met - or intercepted us - during previous visits. We've bought some small car-type kits from e-Bay like this....


and thought they would be the total of what we could provide, but some very kind people at work  - a big Thank You to Margaret and Andrea - have donated enough for us to provide some pretty comprehensive trauma kits which we've made up in zip-lok bags - themselves excellent for sucking chest wounds! 
With our addition of a few bits like sticking plasters and safety pins they'd be adequate for most domestic accidents. A pity, but we felt we couldn't include any drugs. Even the fact that they remain effective long after their printed "use by" date and could be a great comfort to folk without access to immediate medical care, the lack of understanding of the written instructions might make them a bit dangerous to include even if they're just, to us, ordinary painkillers. There's also the possibiity of getting ourselves into trouble with the Moroccan authorities if we import any large amounts of drugs that we can't claim are for our personal use. There are recent reports of other people getting embarrassed by this in nearby countries.

 
 As well as First Aid, we thought about another aspect of health care; for the kids, especially. 
 
Stock image, not ours - but a familiar sight

Anyone who's travelled through the remote areas of the country will be familiar with the constant attendance of the local children whenever the chance arises, and like kids everywhere they've learned to take advantage of tourists. Not to put too fine a point on this, it amounts to begging...often for sweets (candy). The trio in the picture look relatively affluent. Most of the kids we've seen in rural areas are less well presented, to put it mildly...Anyway, wherever they're from the usual reaction to passing strangers is the same - a race to make contact and see what they can "score".

This behaviour has been rewarded by tourists over many years and has contributed to a wisdom that "all Moroccans are very friendly, the children always rush up to you and say hello". This might be true, but the kids aren't doing it at the behest of the Tourist Board - they've got wise to this source of freebies.
The people who respond to this friendliness with "cadeaux" are well-meaning but are contributing, in our opinion, to a potential problem. No, actually several problems. Apart from encouraging children to approach unknown adults - a dangerous habit to encourage - we've seen crowds of school-age kids running headlong into our path as we've driven past tiny villages, clearly expecting that we'll not run them over in their hurry to be first in the queue for whatever Today's Tourists are giving away. They'll survive, of course, providing we've seen them soon enough....but there've been several close calls. We've also had plenty of abuse when we haven't produced the demanded sweets, pens or money, which tends to colour your view of the ever-friendly locals and might put you off from engaging with them at all.
Anyway, to return to the point...if you feed an unknown child with sugary treats in our society you might get several reactions to your "kindness", one of which might be a good telling-off from Mum for trying to pump the Little Darling with E-numbers. In a society that isn't used to coping with the effects of sugar on teeth, you might earn a gap-toothed, blackened smile from a youngster who's won the "bonbon race" too often. And as likely as not from his Mum too. Rant over.😌


So, even though it might be a drop in the healthcare ocean, we're also taking toothbrushes and toothpaste to give away. 


Some these have come free from airline comfort packs and hotel rooms or bought with our Tesco vouchers, but the majority have been donated by our local dental surgeries.


The South Street Dental Practice in Elgin
Another big Thank You to both the South Street Elgin and the Lossiemouth Dental Practices who both responded to our requests for donations so well we're having to reorganise the cargo.


Natalie, from the Lossiemouth Dental Practice


We'll be coming home with quite a bit of empty space..unless we get ambushed by a carpet salesman who makes us an offer we can't refuse.

With everything packed or ready to be, we had a bit of a practise today. We've found that it can be quite difficult to negotiate rocky tracks if the Spotter doesn't speak the same language as the Driver. Things can get fraught. So using the Walkie-Talkies to avoid shouting we rehearsed some ways to drive over an obstacle course made of firewood logs. This is to simulate the difficulty of getting along a rocky track without smashing anything underneath. More difficult than it first appears, because the spotter has to convert "turn to my right" in the head into "left hand down" to the mouth while watching all four corners of the truck and not walking backwards. And pressing the transmit key at the same time.
Sue directed, Mike drove; the objective was to pass the wheels over the logs - representing rocks -  without  missing any. We succeeded, didn't have an argument about it and only hit the gate a little bit. Should be fine, then. No worries....

Monday, 19 March 2018

...and you trusted us again!

This was written over 2 weeks ago but I couldn't publish it from where work has taken me....The saga continues - trying to get a professional tyre balancer/wheel aligner/MoT Centre to sort out the tracking shouldn't be difficult but it appears that Defender wheel alignment is close to bloody Rocket Science, the way these guys are performing. I replaced the track rods and drag link ("cross tube") yesterday. Lying on my back on the gravel, in the snow, with a gale blowing around my ears. I did it because the experience would be valuable, not because I wanted to save the garage any work..actually, based on their recent performance it's probably a better idea to DIY. Anyway, since the parts had arrived in time despite the "Beast from the East" (a barely noticeable snow shower) I thought I'd get on with being proactive and save a bit of time. I tried the "whack it with a hammer against an anvil" method of separating the ball joints with no success. In the end I put the nut back on and just "whacked it with a hammer", underneath, hard - agricultural but effective.

Back at the Well-Known National Tyre Fitter in the morning I showed them how to slacken the pinch clamps and turn the rods by hand - no hammers, blowtorches or Mole grips required - and after a struggle they got everything lined up. I thought. Leaving them the bill for the new rods I drove home, noting along the way that the steering wheel wasn't centred...can you hear the sigh? To quote from an earlier post " a Landrover main dealer for the area is 200 metres away." In the course of conversation the manager happened to mention that they sent their vehicles to him for wheel alignment checks. This is the guy who declared ignorance of 4x4 mechanics, "we don't have much to do with 4x4s" remember? I'm beginning to think that giving the work to this guy was a huge mistake.

So, back home, on my back on the gravel in the snow, I note that the steering drop arm isn't pointing straight ahead. This limits the amount of steering we have left and right. I have 1 and 3/4 turns of left and only 1 and 1/3 to the right....I need to research this as I believe that a small amount of "right bias" is built into the steering geometry, but I don't know how much....in the meantime I'll put the bash plate back on, which is about all I can do before going away for a while. It may be that I just accept that it's "good enough" if the vehicle rolls in a straight line with the steering close to centre, and just move the wheel round to be centred. I don't like the idea, but it'll probably be the least worst option. The reason I wanted the alignment checked in the first place was due to the odd wear pattern on the previous tyres, and only time will tell if that's been cured.
Moving on to other minor stuff, we've modified the attachment for our DIY version of the very expensive "Trasharoo", which is, after all, just a big bag to put rubbish in...


I don't mind spending the money on one of these if it does what it's supposed to do, but the thing I don't like about the design is the way it relies on straps and buckles to hold it in place. Given the cost of the thing I'd prefer a more secure fixing. Straps are OK for something cheap and semi-disposable, but at £65 a pop, these things are worth keeping attached to the vehicle. In Morocco we've had people asking us for our trash, probably because it's imagined to have some useful stuff mixed in with it. We've even been approached by women who were working the fields during a lunch stop; they'd seen Sue putting things into the trash bag and wanted to take it. The bag was, and is, the canvas bag from a "follow-me" shopping trolley-basket. It too was held on by straps like the one above, and was just as vulnerable to being completely removed for its contents.
Our solution, short of investing more cash, is to make use of a plastic-and-fabric wheel cover as a carrier for the bag.


Fastened to the hard cover with short bolts and large washers, it's much more likely to still be with us at the end of the trip and it's useful enough to take the trouble to hang onto it. After all, with no facilities to get rid of our junk other than burying it - which we don't do - we have to have some way of carting it around that keeps any smell, flies and decay outside. The elasticated wheel cover is awkward to get off so is more secure, the bag has no straps to cut or buckles to undo and if we line it with a plastic bag anyone who wants the contents has an easier job. This includes us, so we can empty it more easily. I must be honest, I've been looking for a smarter container but haven't had any luck. I think an old army rucksack might do the job but for now the ex-shopping bag will work.
The Noisekiller engine blanket needed to be replaced.


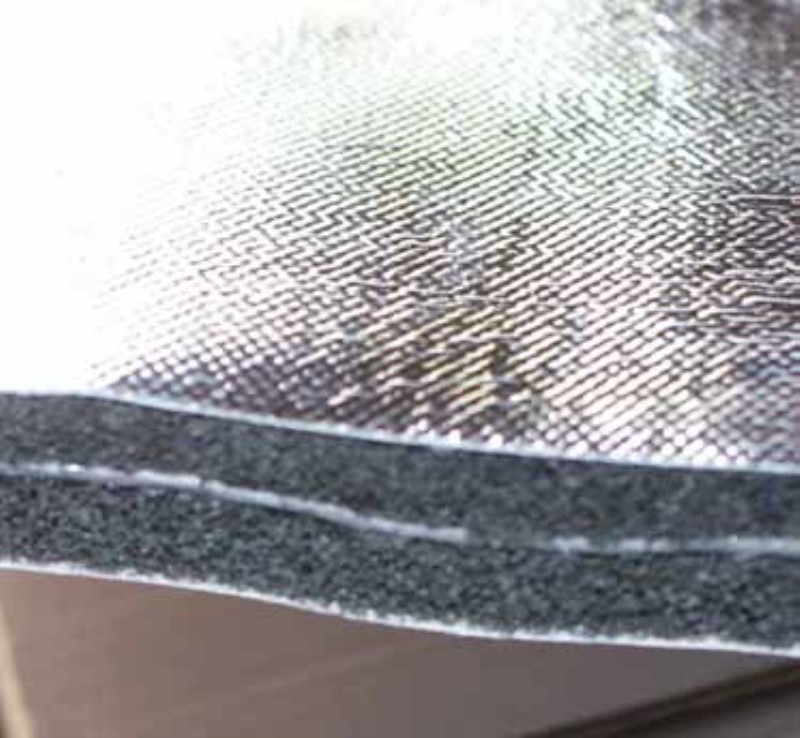
It'd done good service for over 6 years but was now just a bag of shrapnel; the lead sandwich inside the heavy duty bag had just broken up into small pieces and wasn't doing anything useful any more. I was going to replace it with another, but the amount they wanted to charge me for delivery made it uneconomical - nearly a quarter of the purchase price added on for postage! Sorry, but I won't pay that, it's robbery and encourages the practice if I pay it. So, once again it's the Internet and some lateral thinking...


This is lead/foam sandwich, marketed by these guys. I bought the 1 metre x 600mm size, which is plenty large enough to completely cover the 300Tdi engine with a lot left to slide down behind it. One side is heat reflective but the other is self-adhesive. Since we didn't want to stick it to anything inside the engine bay we had to come up with something that would cover the adhesive, be hard wearing and also fireproof. After a bit of thought, we decided to try one of these:


It's certainly fireproof, cheap and big enough to cover the whole side and wrap over the other a little so we can glue it in place. Because it's quite a coarse fibrous weave it didn't adhere well to the self-adhesive layer on the sandwich so using spray glue to fix it might be best if it comes apart. It's also white so will show the dirt quickly, but we can put up with that. It may not be very hard wearing, though. Time will tell, of course, but the reduction - hopefully - in noise level will be worth it. The cost was less than half of the Noisekiller product and covers more of the engine.

While I'm away, the Base Ops Manager/navigator/head chef/expedition medic has been busy stocking up with all the essential stuff that we can't possibly travel without - in other words "We can't buy it Over There". No arguments with that, but I didn't realise how deprived the Rest of Europe is of some things... 


"Just the kitchen sink to go in and we'll be sorted!"


Monday, 26 February 2018

Keeping it legal.


With the annual MoT test due when we return from our travels, I've been doing some reading on the new regulations and discovered - and this isn't a new thing in the rules - that Elly is technically unroadworthy. This actually isn't a part of the MoT tester's check, but it is the law. Odd - you'd think they would agree with each other but apparently I can leave the Test Centre with a valid certificate and get nicked 10 metres down the road by an observant policeman with a tape measure. The reason for this is that the tyres protrude too far from the bodywork. The rules say that no part of the tyre that contacts the road should protrude beyond the edge of the body, which includes any wheel arch extensions. Which I've got, but they don't extend far enough:


This is the same wheel and tyre combination we've had fitted before, but when fitted to Daphne we didn't have the wheel spacers that Elly has got. Opinions vary on the usefulness of these but we decided to keep them and try them out. They're supposed to give a better turning circle, which for a Defender can't ever be a Bad Thing since they have the directional manoeuvrability of an ocean liner.
Anyway, the spacers are 30mm wide, which gives us the problem you can see here. The standard Defender wheel arch extension isn't deep enough.


The solution most people go for is something like this:


These bits of ugly plastic do the job but are a bit macho. They're fixed on with battleship-style bolts and screws which collect crud and rust. They give the vehicle a bit of a "military" look, which we don't want. And they're very expensive.


Searching around for a DIY solution it occurred to us that the design in the picture at left was, basically, the original "eyebrow" with a bit added to the back to make it stick out more. What if I added a bit, but to the front edge?
We thought about various bits of flexible or mouldable material like rubber, plastic, fibreglass or thin aluminium. None of these had a reliable means of fixing to the eyebrows at the right angle - there isn't much of a "lip" to hold a clip so whatever we used would have to be screwed and/or glued in place.

With a bit of lateral thinking, we came up with this:


This is from Screwfix and is sold as industrial door seal. The retainer is aluminium and the bit that does the sealing is a rubber-like strip. The whole thing is semi-flexible and you get 2 pieces each 1250mm long for £16. This is enough for 2 wheel arches. The only problem is they're straight and need to be curved. This requires patience and a bit of thought but, with care, you can get a pretty effective result:

1. Assemble the strip and the retainer, drill some extra mounting holes about 4mm diameter. Having marked a datum point on the arch and the seal, work from one end to the other, gently forming a bend in the aluminium. I used Bulldog (paper) clamps and spring clips to hold it in place as I went along. I did the first one but bent the aluminium first. It was easy but then trying to slide the black "rubber" bit into the now distorted channel was, shall we say, a bit of a test.

2. Eventually you'll end up with something like this.


3. Once the basic shape is formed then clamp it in place and mark the cut points at the ends. Given that the original eyebrows are very flexible - and mine bowed in the middle too - you need to be quite accurate with this final trial fitting. You can see how much things need to be pulled together:


4. Mark the correct length then remove the new extension. I intended to cut the ends to follow the line of the original arch. It looks a bit neater and more "finished". Don't cut it yet, though, in case you need to adjust the position of anything as you make the final fix. This is just to put the holes for the end fixing screws in the right place as it's easier to do on the bench:


This is the rear end of the driver's side

5. With everything secured as best you can, drill through the holes for the fixing screws. Choose your drill size very carefully for the size of screw you'll be using. I drilled 1mm undersize for the stainless steel screws I was using, and tested to make sure it wasn't loose or so tight I'd crack the eyebrow lip - it isn't very thick. Do one at a time and put the screw in before drilling the next one. The lip on the eyebrow is also very narrow so accuracy is needed here. Remember to make sure the top edges butt against each other as the tension in the eyebrow works against this. You may have to jack the bodywork up to give room to get the drill under the arch. The alternative is to remove the wheel, of course, but this makes for a much longer job. It was cold, so I didn't do that. Lazy!


6. Once all the fixings are in place, take it off again and trim the ends to the profile you've chosen:


7. Do a final test fit and once you're happy, apply some of this stuff - or something similar - to the back of the aluminium strip:

I did a trial the night before the final fitting just to check it would stick and it took quite a pull to get the test piece off, so it'll do for what we need it to do.
8. Then fit it all together again, tightening the screws in order. It'll help to have someone support the new piece as you work along the edge otherwise the glue will get onto everything you don't want it to.


I'll probably trim the forward edge to a more streamlined shape, but at the moment it seems about right.

 ..and this is what you end up with. Not really heavy-duty but good enough for us. It makes Elly road-legal now and for £32 and a couple of hours work, not a bad solution. Not only that, but the bodywork now stays cleaner since a lot of the muck that the unprotected tyres threw up is caught and prevented from hitting the bodywork. If it doesn't stand the test of desert travel we haven't lost much and we'll probably do what everyone else does and shell out for those ugly, pumped up things. Or take the spacers off....


"You f*cked up, you trusted us"

Anyone remember Animal House ? The reason for the question might be clearer in a minute.


Mech Prep continues. Fettling and fine tuning, or just generally faffing about, I suppose. All the little jobs that still need to be done seem to be multiplying the closer to departure we get. For instance having changed the wheels and tyres to the "desert spec" we decided that they needed to be properly balanced, and with a tiny bit of wheel shimmy evident again the whole setup could benefit from having the wheel alignment checked. Sandy at IWL doesn't have the full kit so Elly went to one of our local tyre fitters - big national chain - to have it done. This was a mistake. I trusted them. I therefore "f*cked up".
With the work done I drove 5 miles home with no issues, but the following day, driving around, the wheel wobble and vibration through the steering wheel was horrendous. I had to stop 3 times as the shimmy wouldn't stop on deceleration and was so violent I thought something was going to snap. Getting home, I got underneath to have a look. What I saw didn't impress me one bit.


The track rod had been heated around the pinch bolts enough to burn off the paint and melt the nylon in the self-locking nuts, which hadn't been replaced. Evidence of this kind of heat treatment on a steering component is an MoT failure. Elly went back to the Big National Chain for an investigation.


The results of the discussion I had with the manager were positive - he agreed to re-check the wheel alignment - but not until I'd made my disappointment clear regarding the workmanship of his staff, who in turn suggested that if the tracking was out then I "must've hit something".
"Not yet, but I might", I thought, but let it go - for the moment, at least.

My complaint about the heat-treating of the track rod was brushed aside until I pointed out how the clamps are supposed to be released, and I had to insist that new nuts were used to finish the job. The MoT rules state that if the locking nuts etc are missing or damaged then the car won't pass the test. I pointed out to Mr Manager that NyLoc nuts will only "Loc" when the "Ny" is present, not dripping out of the nut like wax. Then it's just a "nut", and worse than useless on a steering component. Since none of these were available, I'd have to go back again to have the job completed safely - for now, at least. I could do it myself, of course, but there's more to be discussed - the question of the track rod damage has yet to be sorted out. As the place is also an MoT test centre then the standard of their work in that area has got to be questioned:


After all that, there's still a horrible vibration which is proving difficult to track down. Everything in the steering linkage, wheel bearings, swivels and track rod ends seemed tight with no play, knocking noises or rumbles, so I was getting a bit desperate for new ideas. I'm off to foreign parts next week for 3 weeks, leaving little time to sort the problem out when I get back. I need to find a solution pretty soon.


In desperation I changed all the tyres around to try to get back to a position we were in a week ago, which was with no - or very little - problem. An hour to swap them all around, a test drive...well, it wasn't a long test. Within a few hundred metres it was clear that the problem was still there and as bad as ever. Back to the driveway and put all the wheels back to where they'd been an hour previously.


Time to get help. With all my previous checks done by just swinging like a monkey on everything underneath that I could get hold of, I decided to try a different attack direction. Sue got in and with the engine running (to power up the steering) she moved the steering wheel to and fro while I lay underneath, tried not to get anything soft caught in anything moving, and watched what happened. Initially it looked like everything was moving the way it should, but as I got more interested it was clear that, with the steering now mobile instead of static there were 2 places that weren't moving the way they should. One was the joint on the steering drop arm. This wasn't moving smoothly and has a definite dead spot in it, together with a "click" that I can feel. This needs to be changed even though the play, if that's what it is, is tiny. It'll only get worse. The other problem was obvious now everything was moving. Remember the Panhard rod bushes that we changed in November? This is the remains of the bush at the chassis end...


The clue was a bit of shredded rubber poking out of the joint. With a bit more energetic movement of the steering wheel the movement got so bad it was clear that the bush had completely disintegrated. I think this is the one that I fitted before buggering up the other one and have Sandy finish the job so I'll have to dig the invoice out and find out where I bought it - and not buy another from the same source.This is probably why the tracking has been out, then adjusted, then out again. It would depend on the position of the axle when the readings are taken. The system is supposed to account for that by the wheels being rotated through 90 degrees for a second reading. This takes care of any variables such as bent rims. They didn't do this.

I took the bash plate off to get a better look at the front track rod and first of all found another buggered nut:

Look carefully and you'll see that the nut is empty of the Ny that provides the Loc.
 and the rod looked as if it'd been barbequed. The problem here - and any knowledgeable metal workers can skip this bit -  is that steel has a temper chosen for the situation in which it'll be used. Some stuff is so hard it'll shatter if you hit it, other kinds are ductile so they'll bend under load to form nice shapes. The latter condition can be induced by heating the metal and allowing it to cool slowly. Like here. Only problem is that this softening of the metal in the steering rod isn't a good idea. Who wants a floppy rod? Anyway, moving on...
The excuse for the heat - once I'd reminded them that it was they that had done it - was that the track rods wouldn't adjust because the threads were rusty. When I suggested that they should use the approved Landrover technique for freeing them the response was "we don't have much to do with 4x4s". They're happy to take my money and press on in ignorance, though.

Peering down the steering damper, this was hard to miss now I had a clearer view:


The pinch bolt on the track rod has been turned so it presses hard against the damper, leaving a bright metal score across it. The score has been caused by the bolt moving left and right across the metal skin as the steering wheel is turned. It's so bad that it's forced the steering drop arm (Landroverspeak for the bit that connects the steering column to the wheels) out of alignment. The only way to get full right steering is for the bolt to force the damper out of the way. Not good.

Altogether, a bit of a horror story. The return visit to the tyre place wasn't successful in terms of getting the new nuts. They "hadn't been able to find any" even though a Landrover main dealer for the area is 200 metres away. We, the manager and I, had a quiet conversation and he's agreed to reimburse the cost of replacement track rods and retainers and re-do the wheel alignment...all I have to do is get the parts here before next Saturday.

I replaced the Panhard rod bush with one from a Polybush kit that I had in the bottom of the spares box. If I'd remembered that they were there I'd probably have used them when we did the job last year, but I used rubber ones instead. The idea was to put the Polybushes into the spares box for the trip since they're "easy to replace in the field".

Well, the split - that is, two-part ones - might be. The one piece versions? Not a chance. Despite trying my best with the big vice and various sizes of sockets I couldn't get it to go in, so it was back to Sandy and his expert workshop to sort it. The result, now that it's back on the truck, is the complete absence of any steering wobble! Hurrah! Sandy's solution to fitting it was to soak it in boiling water for 5 minutes. Why didn't I think of that instead of lathering it with more lube than an inflatable sheep?
So, I needn't have ordered the new steering damper, the new bushes, the new drop arm ball joint kit...Oh well,they all need replacing anyway, probably, so I might as well get on with it and prevent problems in the near future. The new damper only took minutes to fit and wasn't expensive, and the ball joint can wait until next week when I have to take the steering linkage apart anyway.

Overall, a busy few days. A few lessons learned and, best of all, the smooth ride restored.

Monday, 5 February 2018

Clock's ticking....

Time to get stuck in to the work we need to get done before the end of the month. I have to be away for over 3 weeks in March and with the departure planned for early April we need to get ourselves sorted out. By removing the CB aerial I was able to get Elly's front end far enough into the workshop to protect me from the howling gale and driving rain that always seems to be a feature of working on anything nowadays. At least I can shelter behind the truck for at least half of the job if the wind direction is right.


 But, as you can see, there's not a lot of room to spare. Certainly, if I want to jack the front end up then I have to be aware of how little room there is! Doing the same with the back end isn't possible because of the roof tent.


New windscreen wipers were a necessity after driving against the seasonal low - and blinding - sun a couple of weeks back. With the screenwash freezing on the glass and the wipers like toothbrushes I had to resort to a sponge and a puddle to see where we were going.


The second job last weekend was to sort out the brakes. I doubt, from the colour of it, that the brake fluid has been changed in quite a while...


...and while I was at it I decided to check the wheel bearings, swap the wheels and tyres for our "desert" ones and replace the rear brake pads. As usual, this became a much more involved set of jobs than I'd planned. First of all the parts I ordered took an age to arrive after the supplier declared some things were "out of stock" despite saying the opposite when I placed the order. Then the courier delivered everything to the wrong address and I had to spend 2 days tracking it down. I know that it's not my responsibility, but if you don't help yourself, nobody else seems to give a toss. Then I opened the box....


Anyone reading this that does their own maintenance knows the reputation of the "Blue Box Bits". Had I known what I was going to get I wouldn't have ordered, but the ad didn't make it too clear, or maybe I didn't read it carefully enough. Anyway, having waited nearly 2 weeks for the stuff I needed to get on with the job. I can see myself replacing the pads sooner rather than later, though. The fitting kit that I ordered seemed OK with all the new bits - retainer pins, springs and split pins.... 


First stage, then, is to get the wheels off. Now, having had the wheels balanced a while ago I hadn't tried to take them off since. The usual tools had no effect on the nuts whatsoever - they were seriously tight; so much so that I managed to bend the Landrover-original wheelbrace.


It should be the shape of the one on the top. A good job I discovered it now as to have this problem with wheel nuts while at the side of the road wouldn't be too great. It took an impact socket and a 5 foot lever to get the buggers off.


Stripping the hubs back to the bearings is easy enough and the front wheels had a tiny bit of play that I felt needed to be taken out. Sandy at the garage suggested that a "tiny bit" of play is OK, but what's a "tiny bit"? I decided to set the bearings again with the torque from the manual and see what happens. I replaced the drive flanges while I was at it, since these seem to wear out quite quickly. 


Getting the wheel spacers off was quite easy  -I was expecting a fight - and the front drive flange bolts had been replaced with some with socket heads. I was a bit worried that if these "rounded" when I put the key in, I'd have more trouble getting them off than if they were the standard hex bolts, but they came out really easily despite being coated with more Loctite than they really needed.


It took a lot of work with taps and dies to get it all off and clean the holes.


Difficult, but if you look closely you can see the difference in the shape of the "teeth" on the flange and the space between them - the new one's on the top. On "Daphne" I replaced them with heavy-duty items but never felt totally convinced that this is the right thing to do. The flanges are a sacrificial item and a bit easier to change than a halfshaft, certainly easier to carry spare flanges than spare shafts. If the flanges are stronger the next item in the chain to wear out would be the splines on the halfshaft....I think I'll stick to carrying spare flanges.


With all that done  it was time to replace the brake fluid. I used one of these to make the job "easier"....which equals not needing any help. 


This is a Gunson "Eezibleed". You fill it with brake fluid and pressurise it with a spare tyre, the idea being that as you take fluid out at the caliper it gets replaced automatically at the reservoir so removing the need for a helper to pump the brake pedal to achieve the same result. And it works....but only for the front brakes - the ones closest to the master cylinder. I had no joy at all with the rear brakes despite pumping the "system" up to over 30psi - the maximum advisable is 20 - and taking the risk of something bursting and spraying brake fluid all over the place. In the end I gave up and The Sorcerer's Apprentice had to be dragged out of the kitchen to assist.


Then it was time to replace the rear brake pads. An easy job, takes mere minutes, and we've got all new parts, right, so no scratching around for replacement split pins and all that....Now, you'll recall my wariness of the "Blue Box" contents? Here's a typical problem:


The new retaining pins are shorter than the old ones. The part number is supposed to be the same as the ones I'm replacing. The result is..... 


....the new ones are too short and the split pin that holds the whole lot together won't fit. Britpart, AKA "Sh*tpart" to many people. I had to reuse the old ones. Nice new springs, though.

Finally, on with the new boots. Shiny wheels, too. Good to go.


Finally, the annual MoT test will be due when we get back, and the rules have changed so that any removal of emission regulators etc will mean Elly not getting a "pass". Since the PO had removed the EGR regulator - and I did the same on Daphne since they do nothing but gum the system up with old oil - this bit of the engine needed to be replaced. A search of the internet revealed that the cost of these things is enormous, and added to that all the bits of hose, solenoid etc needed to put everything back was even more expensive. Given that most people would've thrown the parts away after removing them years ago, there is probably going to be a lot of folk searching for cheap bits from scrapyards across the country. I reckon, anyway, so I picked up some stuff from eBay to refit. Might be a waste of money but maybe not. Anyone want to bet?