Wednesday, 12 April 2017

Opening Pandora's Box.

...but it seemed like a good idea at the time.


A can of worms - Pandora's box


"...the proverbial phrase refers to a source of endless complications or trouble arising from a single, simple miscalculation".


We're picking up the thread left by the "Aftermath" post back in February. We've wandered off on a long tangent with our discussions about Daphne and her development, so now it's time to get back on track.


So..."A Good Idea At The Time". How often have you heard that? But buying this truck as opposed to all the others on offer at the time seemed like a good one. For example, one of the "Expedition" Defenders I saw advertised was described as having "a snorkel - not plumbed in, but looks the part". What does that tell you about the vehicle and the owner? Car Park Poser?


So, after a long series of phone calls that checked every item on the sale particulars, we became the owners of a 1995 110 Defender that we'd not actually set eyes on. Why should anyone take such a risk? Well, mainly because of the rapport I struck up with the seller and our knowledge, hard won, of Defenders. He's in the aviation business, like me, and given that he's regularly responsible for hundreds of lives, not to mention a couple of million pounds worth of aeroplane, we thought we could rely on his word.That he'd tell the truth, in other words. Not lie.
"If there's anything wrong with it, tell me now and save us time and disappointment" is what I'd said weeks earlier.
"No, there's absolutely nothing wrong apart from the usual cosmetic stuff. It could do with a respray. Everything is in top condition. It's just had an MoT and sailed through. It gets serviced every year at MoT-time and I watch while it's done".
Yes, we were competely sucker-ed in! You'll see why eventually.


I flew down on the early-bird from Inverness to Gatwick, caught the train to Haywards Heath and sat in the station cafe to wait for the seller to turn up. With no sign of him at the agreed time, I call him. His first words: "Er...didn't you get my e-mail?" As you might imagine, this question didn't put a smile on my face; something's clearly gone wrong with the plan.
It got worse. "I know I said the MoT was done in March this year, but I made a mistake. It was March last year. But it's OK, it's at the garage now, being done. There won't be a problem. Can you find yourself something to do for a couple of hours?" Brilliant! Still, having not met the bloke yet, and the deal still to be finalised (I had a large wedge of beer vouchers in my pocket) I kept my opinion of his memory and personal organising ability to myself. How do you get an MoT date wrong by a year? Particularly if you always attend the event in person....


Now, I don't know if any readers know Haywards Heath, but there isn't a great deal to do at any time, let alone a wet weekday. I found the library, eventually, and sat reading the paper and wasting precious time.


I'd arranged the insurance to start at 1200 and had a 600 mile drive ahead of me and work the following day. No pressure, then.


At 11 he picked me up in a builder's wagon. I was expecting a yellow ("mad yellow"  - what?) Landrover. I cleared the crisp packets and crumbs from the seat and got in. "Bit of a problem - it's failed the MoT on a couple of small things - like wheel bearings - but they're doing it now and it should be ready in half an hour...." Small things, wheel bearings, not important at all and really hard to check....my opinion of him slips another rung down the ladder.
To fill the time he drives me to his home and gives me a guided tour of the enormous palace he's building in the garden. I get a complete breakdown of the cost of every door handle, light fitting and tap and we go from room to room chatting to the contractors and generally killing time. He gets a call from the garage. They can't find the key for the locking wheel nuts.
"It's in the cubby box, or under the seat somewhere. I'm sure you'll find it".
So, they haven't even started on the wheel bearing then....20 minutes later and he gets the same question again, rummages around for a minute or so and then finds said wheel nut key in his jacket pocket. I am not impressed and suggest we take a trip to the garage, deliver the key and at least get started on my inspection, if they'll let us.

They won't. No surprise, really. Very few workshops let the customers see what's going on. I eventually get to see what I've come to buy at 12:21. I know that precisely 'cos it's time stamped on the MoT certificate and I also checked my watch to see if I was now legal - insurance-wise, to drive it. I'm now running over 3 hours late on my timeline so the inspection, back at the "ranch" is going to have to be a lot quicker that I'd planned. Hopefully, though, our long discussions about the vehicle's condition will make it easy.


Once we're back I get the first chance to have a good look around. The first place I go is under the bonnet. Not to see the engine, but to check the bulkhead - a well-known Defender rust trap. This is what I saw straight away - only this is from the other side.....
The other side of this was easily spotted due to the daylight shining through it.
I discovered later (at my home garage) that this is an MoT fail - it's right next to the pedal box. The MoT was less than an hour old. How does anyone with even one eye miss this? Makes you wonder why we bother, doesn't it? Not to mention the meticulous inspection allegedly done before I arrived. On the plus side, this was the only major thing that I found in the short time I could spend crawling about over and underneath it. Everything else seemed to be as I'd expected so I didn't have too much trouble with the money side of things other than to promise that I'd be in touch when my garage had inspected the rusty bulkhead and come up with a plan to repair it. I had no time to make a careful, inspection of the tent and things except to make sure it was all there, but the amount of green algae on the truck's roof and faded covers suggested that it'd spent rather less time "always garaged" than I'd been told. Since I was now going to miss lunch he made me a sandwich and donated a bottle of water - perhaps in lieu of the £1 change I was due from the pile of notes on the table.


As I made to drive away, he opened the door and said "Oh, don't forget to check the water and oil once in a while"...valuable advice. I hadn't thought of that. And then "and you might want to check the battery, too. Have a safe trip." Check the battery? Woffor? Is it going to leak away or fall out? I didn't give the suggestion any more thought; or rather I did, but kept it to myself. Not much I can do about it now, anyway. M25  - otherwise known as the South Circular Car Park - ahead, imminent rush hour traffic and 3 hours late, oh joy.....


Thursday, 6 April 2017

Shaking down, gearing up.

A "shakedown trip". That's what we needed to prove that all the modifications and innovations would actually work.


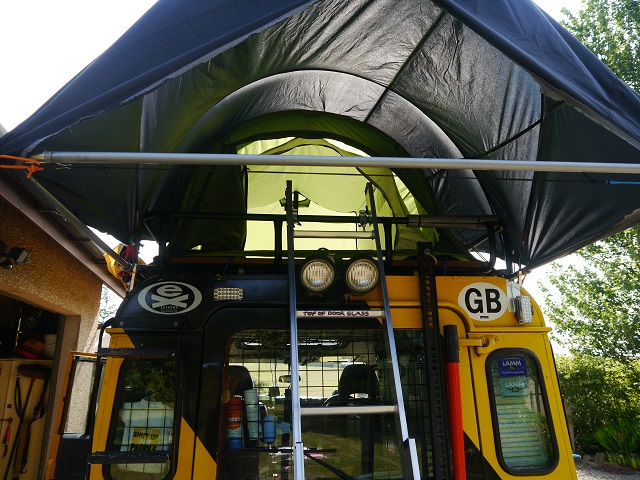
They say that "no plan survives contact with the enemy", and the enemy in our case was going to be the reality of living off-grid for a few days at a time. We also wanted to continue experiments with tents and made up our own temporary roof-top-tent:


 You'll recognise this from an earlier post, perhaps. To set this up we made some boards for the rack that  gave some support to the floor and also doubled as traction/sand ladders.
We had some ripstop nylon from an old flysheet and a couple of long fibreglass poles and these were used to cobble together an "entrance porch".


 This worked very well in terms of providing shelter to the door. If it weren't there the angle of the pop-up's door wouldn't keep the rain off the bedding. As there wasn't much room in the tent to dress etc we felt we needed to open the entrance to do this comfortably so the entrance would need some cover.


This was the result. You can see that we've used the shower curtain support to tension the end of the porch and a cheap loft ladder to get up there since it needed a lot of acrobatics to use the rack ladder to get in. The front end of the sheet was tensioned to the front of the rack using bungees and then stretched over the pop-up's roof and down to the back.
The fibreglass poles were bent into arches and fed into aluminium tubes fixed to the rack at the appropriate angles....


.....and although it looks - no, it is -a bit of a lash-up it worked well enough since this was only a trial set-up to see if we liked roof-top sleeping. It was, admittedly, a right PITA to put it all together and involved lots of climbing about and some precarious positions on the roof, not to mention having to offload all the roof cargo before we could get started. However, it served the purpose and convinced us that RTT sleeping would be OK. The disadvantage would be the weight of a properly made and fitted tent and the possible loss of useable rack space for kayaks. It may not even be possible to use it for boat transport at all. Hmmm.

By the end of 2 weeks we'd used the system 4 times. One of the fibreglass poles broke as the curve it was forced to take was too much for it. The mattress was 2 foam fold-up sleep-over pads from Aldi which we'd used in the Oz-tent. As I said in a previous post these take up a lot of room. We tried to store them on the roof but the time it took to get them into large plastic bags and then make these weatherproof was too long and didn't give them chance to air properly. To avoid having to sleep on damp foam we ended up with them in the back - and in the way, most of the time. This was something we'd not forecast and suggested a future problem with an RTT where it wouldn't be so easy to get the mattress out and dry it if it got damp. We were proved right when Sue left the tent door of our RTT open one night in Morocco and it rained. It took 4 days to dry out the bed....but you can read about that in last year's (2016's) diary.

We also troop-trialled some more additions to Daphne's storage. There's a lot of wasted space in and around the Defender, some of it under the wheel arches and floor. We thought we could make use of some of this to store things that would need to be easily accessible and /or smelly/messy if kept inside. Things like spare gas bottles, fuel, oil, grease and anything else that wouldn't be too affected by a little water or mud.


First, cut your hole. After spending 2 weeks measuring it again, and again, and again...
then bolt in your box and camouflage it with some paint
then fill it with stuff to show how pleased you are that it actually worked.

 This little box was marketed as a deck storage compartment on a yacht although we saw others slightly smaller for sale on dedicated "landrover" sites for a lot more than we paid for this. It's not quite small enough to go into the space "square-on" but by tilting it a little and trimming a small piece off the mudguard it can be made to fit. We thought we could stand the "off-square" look for the benefit of lower cost and greater volume. The catches are lockable and, even though it's only plastic, it's extremely durable, watertight and secure. In Morocco last year one of the catches jammed when something shifted inside the box and the lid resisted all attempts to prise it open. Of course, nothing will resist a determined attack, with a jemmy or a mallet in this case, but it's good enough for normal use. We eventually used it for carrying emergency kit - the air compressor, hose and inflator, 2 folding axle stands and a bottle jack. Oh, and 4 folding chocks. And the tyre deflators. With some space to spare.

The area under the footwells just cries out to be made more use of. Mike found that 2 old drill cases were the perfect fit, supported by the outriggers:

These were filled with bottles of oils, brake fluid, Radweld, grease - all the stuff that you'd not want to leak inside the truck and make a mess. We finally used 2 bungees to hold each in place and never lost anything. The levelling chocks also went underneath although these suffered a bit during some really rocky transits. The chocks slid neatly between the chassis rails and the horizontal stay for the side steps that we put on so I could get in and out more easily. Mike modified the fixing so these could be used with the rock sliders. Unfortunately these steps aren't ideal for rough tracks with large boulders and suffered a bit. In fact one of them got so badly mangled we just took it off completely before it fell off.


Inside the front wings there's lots of empty space which is easy to get to.


We made a hinge for the dummy air intake on top of the OS wing and lined the space underneath with a sausage-shaped zip-up bag contained within chicken wire mesh. This was used to store lashing straps, bungees and other tie-down kit. The hinged flap had a lockable catch. The other wing space is the real air intake for the heater so space wasn't so abundant, but we managed to store a back-up foot pump and a complete set of coolant hoses there. If you look around there are a lot of other little nooks and crannies that can be made use of - for instance our ready-use engine oil was kept alongside the brake servo.


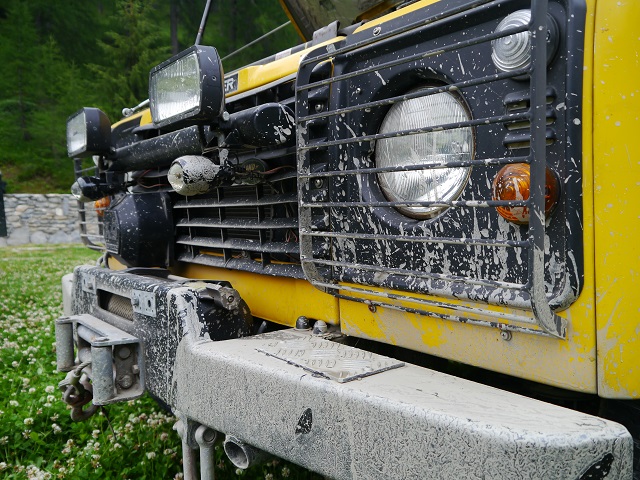
There were a few other little bits and pieces that we thought might be a Good Idea. Take the extra lights, for instance:

For those of you who think that the small foglights are just "bling", they were ideal for illuminating the ground very close to the front wheels, unlike the spots which were there for long range use. By contrast, the winch was never used but everybody has one...right?
As the standard Defender headlights are so, well, dim, we tried to augment the illumination of the road ahead by adding some cheap spots and foglights from Halfrauds.


The spots  - long range driving lamps - worked well enough but because of the UK regulations could only be used when the "fullbeam" lights were on and had to be "off" on dipped beam. This made them useless for giving us a better view of the road under normal conditions if there was other traffic around. The smaller fogs were an addition to light up the ground close to the front of the vehicle. Our expeditions to our local pine forests to collect firewood made these very useful as they allowed us to see the ground 3 or 4 feet in front and to the side of us which would otherwise be in darkness. The hole you'll fall into needs to be seen if you don't want to bury yourself in it, right?
When we set Daphne up for Morocco we took all these off. They are only any use if you intend to drive at night. Having read all the warnings about Moroccan traffic we decided we weren't going to so we didn't need them. They never went back on but were included as an accessory for the new owners. They also got in the way of the "dead lift" of the bonnet. Because it's very heavy with the spare on the engine lid, Mike needs to get hands underneath the front edge to push up from a squat. This is difficult to do if there's anything forward of the grille at the critical height.


The light guards might look as if they're a bit unnecessary but as we have a lot of game birds around the back roads that continually commit suicide by flying head-on into Daphne's front end, we thought they'd be useful. And so it was - one particularly stupid pheasant hit the offside headlight square on, or would have if the wire guard hadn't been there. The guard was bent right in and the top of the wing forced back a few mm. If it hadn't been there we reckon we'd have lost the headlight, the indicator and sidelight, the plastic surround and a load of cash to replace them, not mention the cost of the panel beating for the dent in the wing. The bit of roadkill for supper wouldn't have made up for it...


We needed somewhere to store the Hi-Lift jack so made up a couple of brackets. The top one seen here was part of a commercial kit while the bottom was a mounting plate for a TV aerial, modified with a padlock and locator pin. Worked a treat, cost pennies. Later we made a cover for the jack's vital parts from an old inner tube; not totally weatherproof but good enough to keep the worst of the crud off it.

Bush cables. Why? Not only do they actually work quite well as we found in some of the more overgrown parts of the Alpine trip, they also provide a useful handrail when climbing onto the roof. With a lot of kit (and eventually a roof tent) blocking access from the rear then the only way onto the rack was over the bonnet. The spare wheel provided enough of a step to do this fairly easily but the journey from front bumper to the roof and back was made much easier and safer with something to grab onto. Later, in Morocco, we found another use for them as drying racks and washing lines.


Rock sliders. The original sills were past their best and we'd tried to re-invent some old-fashioned running boards to give easier access to the cab. While these worked they looked a little odd - made, as they were, from lengths of decking left over from a garden project. Mike found some rock sliders advertised in one of the Landy magazines, made to order near Northallerton, Yorkshire at a price well below the usual. These were well made but the powdercoated paint finish was total rubbish and they began to rust through within a month or so - almost as if the metal was corroded in the first place. A lot of unnecessary extra effort went into trying to sort this out, which once the rust has started is very difficult to stop. Nevertheless, they proved their value on a couple of occasions so a good investment despite the corrosion.
Wouldn't go back to this manufacturer, though - a thoroughly unpleasant individual.


Jerry can storage. These are something else we didn't want inside or on top.


We found a company making these hang-on-the-side storage cradles but couldn't justify the cost of one, let alone two as we wanted to carry both spare fuel and water as well. A bit of study showed that they were basically hung off the roof gutter and somehow fixed at the bottom. We pulled some galvanised cage mesh out of a skip and tried our hand at making our own. The locking straps are modified gate hinges and the bits that locate into the gutter were made up from Dexion. Plus a lot of cutting and grinding and some of our first experiments in MIG welding. Lesson #1 - grind off the galvanising before using the torch or have a lively, sparky time!


Jerrycan racks. The mast steps were useful for roof rack access.

They survived the Alps trip and two expeditions to Morocco so we're quite pleased with them. Our Tour guide in the Alps was equally pleased we had them when he ran out of fuel at the top of the highest road in Europe. Not sure that they're strictly legal in the UK but no-one's ever complained.

Once the Alps trip was over, we decided several things:

1. We quite liked roof tents for touring if the ground wasn't fit for a tent even though that would be our preferred option.
2. Very little needed changing although after the first Morocco trip we'd take a second spare wheel which required a wheel carrier on the back, and the awning wasn't really up to anything more than keeping the sun off the wine.
3. We didn't like driving in other people's dust cloud and working to a schedule. I guess the latter is unavoidable and part of the deal on that kind of trip, but the former meant we were often hanging back to keep out of the murk and lost a lot of photo opportunities as a result - not wanting to hold the group up or lose them at the next turn.

So, having digested the lessons, within a few months we bought this:


A "Chinese Knock-Off" of a popular design, imported by a UK company based near Derby. A very good price compared to the usual competition. Here's our review:
Pros - a LOT cheaper than most of the rivals of the same dimensions. The porch can be left attached when folded and it's almost 20 kg lighter. This is because of the...
Cons - nylon instead of canvas so not as hard wearing and more condensation to deal with. Noisy in a breeze. Zips of dubious quality. Mattress about 2/3rds thickness of the top brands. Side skirt "ground floor room" won't reach the ground from a Defender roof height and the groundsheet is therefore going to have a gap to close. The transit cover was far too tight to allow the zips to survive normal use but it was deep enough to cover the tent and be secured with straps over the top.

The tent arrived with minor damage to the base and we negotiated a discount for that. The groundsheet was supposed to be supplied with an extension panel to cater for the increased height of our rig - we bought the ladder extension to solve the entry problem but the promised groundsheet extension was never made available. In the end we had one locally made and the importer paid the bill, so top marks for product support. They also supplied a replacement cover when the zip broke and a replacement pole for the awning  - see below - all at no charge.
On balance, this was a good buy and apart from some problems with zips it performed very well. We made a false ceiling inside from an old cotton bedsheet. This caught a lot of the condensation which anyway wasn't excessive most of the time and provided the window vents were open wasn't really noticeable in warmer climes.

One thing that was a surprise, though, was the often-quoted "good reason" for having a roof tent: "You can leave the bedding, and everything inside and it's ready to climb into at the end of the day". Yes, if you don't mind sleeping in damp - and getting damper every night - duvets or sleeping bags. No matter how little condensation we suffered inside the tent the things we slept in and under would  need airing. Even then if we folded them away with the tent they'd be unpleasant to sleep in. The first job every morning was to get it all out and hang it over the bush cables or open doors to get properly dry.


We replaced the home-made awning with one of these from the same source as the tent:


...or rather, something that looked very much like it.


 Looking at the website it appears that these are no longer available. A problem with product patent, perhaps? We suggest this because it had a striking resemblance to another product from a well-known manufacturer but at less than a quarter of the price. The shelter it gave to the back and sides was outstanding and it took very little time to deploy. Mike got the impression that the importer hadn't really had a close look at it, had never used it and couldn't explain how some of the features worked so we found out ourselves by experiment. For example, rainwater would pool in the middle of the wing sections unless one threaded some cord through the tubular "pockets" along the outside edge and this gave a nice straight edge - a gutter -  to the awning. This would allow water to run off if the middle of the gutter were either tied down or, as we did, a small stone used to weight it. The alternative would've been to rig the outside edges higher than the inner so water would run back towards the vehicle as the set-up above seems to suggest. Our awning lacked the "elephant's trunk" to allow this to happen neatly and anyway, who wants a puddle just there?

This is half of the windbreak - and a very clever chair from FrontRunner


The telescopic locking poles could be a bit awkward to operate but once in place they were sturdy enough to support a windbreak which we made to fit. This would give us an enclosed eating and cooking area which, given the desert winds we experienced in 2016, is well worth making.

The Frontier stove was an impulse buy.


Yep, we admit it, it seemed like a Good Idea At The Time. The chimney sections went together like the legs of a Flowerpot Man and the damn thing is a nuisance to keep alight whatever you choose to burn. About the only thing we found would produce heat rather than smoke and not need constant attention was camel dung. Difficult to find in someplaces, though 😎. We replaced the chimney with a length of flexible exhaust tube and this allowed us to direct the smoke out of the awning and still keep the stove somewhere useful. You can buy a bent section to do this but it cost more than it could possibly be worth and wasn't so easy to use - the double bend allowed it to swivel about with obvious problems arising from that. The new chimney strapped to the side of the roof rack for travel. About all we can say for this stove is that it could keep a kettle on the go and save a little gas but to keep us warm on those cold desert nights?. .....a fleece jacket is 1/20th of the weight and easier to pack. Doesn't get you in trouble with the neighbours, either.

Well, that's a long post. We thought about adding a couple of lists of the spares we carried (to Morocco) and where we stored it all but unless we get a request for these then it ain't worth the effort.

Next time, we can return to Daphne's successor - and the saga that goes with it.


Thursday, 30 March 2017

Some late additions.

Just in case you're all getting bored (probably) and want a change from the construction blog and our opinions on everything (certainly), we've moved the blog from our first trip in 2015 to this one to give you something else to read.

Just click on "2015" for our first attempt at this lark. Obviously it'll contain some references that may not make a lot of sense since it was never intended that this blog - from 2016 - should be a natural sequel to the earlier one. We've also made a few references to other trips which are probably best left as they are.

Wednesday, 29 March 2017

You can't really sleep in there....can you?

Yes, that was the idea when we started. It is, though, mighty cramped and not something you'd want to be doing very often, which is probably what really makes Daphne not a "motor caravan" by most people's definition. It works for  a solo traveller, especially if the environment is a bit hostile. Like, with bugs of the Midgie variety. But even in an emergency - or a quick 40 winks on a long journey - it requires some patience to make it work. Stuff has to be moved out of the way before the beds can be sorted out and if 2 people are involved this generally means some comedy in such a confined space. Cosy, though.


Clearly, accommodation options need to be assessed for comfort and practicality too, and since we'
ve both done plenty of backpacking we're used to ground tents, their advantages and otherwise. With the ability to carry something a little larger than a Pup tent (that gives our age away, right?) we looked at the options, and there are a lot:


1. Standard touring tents.

"It's your turn to fill the waterbed".

Either backpacking tents on steroids or full blown "family" tents with party rooms, 2 bathrooms and fully fitted kitchens. Probably OK for a base camp but a bit of a chore to take apart and then reassemble every day.

2.  "Quick-Pitch"/Pop-Up/festival tents.

Are you serious? Well these are actually quite useful in that they give you somewhere to store outdoor/wet gear and stuff you don't need inside the truck. Quite a good idea on kayaking trips to keep all that salty kit separate and away from any metal. We bought one for this reason but as somewhere to live/sleep....nah. However...it did come in useful later when we experimented with other options.


3. Expedition tents.

Various styles ranging from teepees in ripstop nylon to original canvas bell tents complete with stoves and reindeer-skin carpets. Mike helped to put up a teepee-style tent on a kayaking trip and while it gave plenty of space it took 20 minutes just to get it up. Without several people working at it this would be quite a challenge in bad weather. We quite liked the Oz-tent design, though, and put it on our shortlist for another look once we'd explored...

...4. Roof-Top Tents, or RTTs as I believe they're called.


We quite liked the idea of sleeping on the first floor, so to speak, but were a bit put off by the weight of these things - in excess of 60kgs,some of them - and the load rating of the Defender roof gutters is supposedly 75kgs in total. Given that the steel rack probably accounted for about a third of that we were going to be over the limit on the design spec. There's probably a healthy safety margin factored into that figure, but we couldn't find anyone who'd admit to what it might be. And the weight of gold one would take from the purse...Hannibal tent, sir? Or second mortgage? On top of that (no pun intended) there was the taking up of essential kayak-carrying space on the roofrack. Initially we discounted RTTs, but our interest in a Moroccan trip changed our minds later.

5. "Annex"-type tents that use the Defender's body as part of the support.

There are several of these around and they looked quite cleverly designed. Some could be used on their own while others wouldn't stand up without being attached to the vehicle.


Military surplus 9x9
This would preclude them being left in-situ while the vehicle left the site for a while, if only to get the groceries. All of them had the feel of a "lash-up" although most had been cleverly thought out and would be adequate for the occasional outing or for a wet weather shelter at the beach. We didn't feel that they'd be substantial enough for our needs.The military solution is the "9x9" (feet square) tent with a roll-up side into which the vehicle is shoved. Mike's experience of these has been good, but they are very heavy and awkward for 2 people to put up and dismantle if one of them isn't 6 feet tall!

6. Awnings and add-on side panels (to make a "room").

 We'd already made an awning -which was really no more than a sunshade - and thought about adding some side panels to make a sleeping area. Advantages? Quick-pitch, self contained. But...still dependent on the vehicle for support, can't be "de-coupled" for the day trip from the site. To be properly weather and bug-proof it would need to be a more substantial structure than we could achieve with the materials and tools we had and the more substantial it became the less "quick pitch" it would be.We'd need to buy something "proper". Which equals expensive and heavy and not what we'd want to do for an experimental solution.

Here's our homemade awning:

The poles and guys are for the Oz-tent, not the awning.
 It's really no more than 2 pieces of 12mm ply suitably stiffened and attached to the rack using farm gate hinges. The cover is shower curtain material. Since this is very light we reckoned the awning would be self-supporting on the heavy hinges and not need any vertical supports. This was correct. We originally made the cover removable using turnbuckles, but we realised that it'd roll up and stow quite well so it could be left in place.
 
However, the lightweight material had a major drawback; it wasn't strong enough nor taut enough to resist the "pooling" of rain, so any time there was any wet weather we'd be pushing bulges of water out of it - with all the accompanying splashes, mud, puddles etc. We tried to tighten it by using a telescopic "spreader bar" between the side arms which helped a bit but not enough as there's too much stretch in the material to let water run off quickly. You can see, though, that the height of the Defender married up well with the height of the Oz-tent, a benefit we made use of later.


All this prompted us to sit down and assess what we needed and how we would use it. Base Camp or Touring? Flat, grassy terrain or rocks? Quick pitch? Storm proof? Bug proof? Standing room or get-dressed-on-your-back? Camp beds or mats? Sleep double or single? Crawlycreature proof? The list is potentially endless, which probably explains why there are so many options available. Everyone will have a different set of priorities on their wishlist. We reckon this is a Good Thing; if nothing else it keeps the market interesting and the choices wide.

So, winding the clock back a bit, the initial requirement back in 2010 was for a Base Camp system.  Daphne would be used, once the destination was reached, for carrying boats and people to and from a launch point and returning to the Beer Fridge by sunset. This would be on a "proper" campsite hence flat, grassy and immune from most ground-based predators. If we were touring in Continental Europe the tent would need to be reasonably easily (read quickly) pitched and packed since we'd probably be moving every other day if not more often but using established sites which would be Flat and Grassy. There would be a need to leave the tent on-site for some of the time.


At the time, these criteria ruled out the RTT. Even though these are "quick set-up", if you intend to return to the same site in the evening your "pitch" won't be reserved by the presence of your tent, so you run the risk of getting the last space - if you're lucky - which will inevitably be next to the chemical loo disposal or the discobar. For the same reason the Awning combination wouldn't work and neither would most of the Annex-type designs since they need the vehicle to hold them up. Festival or "pop-up" tents are too basic and cramped but might be useful as a marker to reserve our pitch if we decided on a vehicle-attached option in future. Family tents take too long to set up and pack up, not to mention being generally bulky and far too well-appointed for what we need although some of the teepee designs were attractive in some ways. Military surplus with modifications = heavy and difficult to manage for the two of us. This left us looking at the likes of the Oz-tent. Heavy duty, well made but expensive. Very quick to pitch and strike. Flexible in their use in that they can be pitched alongside the vehicle but "connected" to it. Good reviews but mainly from those who are travelling the Simpson Desert or Namibia, not The Outer Hebrides or France. Would this be overkill?

Our visit to Adventure Overland provided the chance to look at the options in detail. We went, we saw, we felt the quality and measured the width. We climbed in, crawled under, looked over, smelled, scrutinised, hummed, hah-ed and haggled. And we bought an Oz-tent, the RV-3 model for a bit of extra space. With the bits that go on the side. It looks like this:


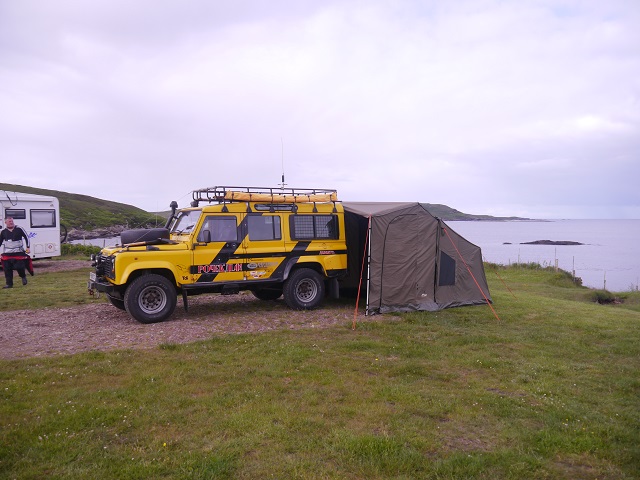
Once the Defender is set up alongside, it can look like this:


or like this:


or this:


The sales blurb claims this tent can be pitched in 30 seconds. This is no lie. In fact from putting the parking brake on, Mike could have the tent off the rack, set up and beds ready before the kettle had boiled. The side panels took a little longer to attach as these zip on. The zips are good quality, heavy duty things but we did manage to have one break on us soon after we started using it. The supplier replaced it for free. Getting the panels aligned to do the zips up can be awkward and although it can be done solo, 2 people make the job a lot easier as the panels are quite awkward to manipulate, especially in a wind.


The extra shelter they give under those conditions is worth it. Set up as in the picture it is exactly the right height to allow the back or side of our Defender to be completely enclosed, similar to the "Annex" tents, but without needing to be attached. Note that if you fit your Landy with beefy lifted suspension this may not work so well.
We found the interior just long enough - front to back - to allow us to fit 2 camp beds in although they touched the walls at each end. We also experimented with thick sleeping pads which were very comfortable but were a pain to carry since they took up so much space in the back. We like to have easy access to the "kitchen" during the day so to have to unload a lot of kit to have a brew or make lunch isn't ideal.


Other points:


1. The sewn-in groundsheet is very tough but the feet of a camp bed might challenge it on soft ground. We'd recommend padding to protect it.
2. There's plenty of ventilation and we needed to use it most of the time; that is, peg the rear window flap open and keep the top half of the side windows unzipped a bit or condensation becomes a nuisance. No worse than on other tents we've used and a flysheet might remove the problem if you can afford one- and be bothered to fit it. As supplied and in a European climate the moisture tended to collect on the aluminium frame and drip onto our beds or clothes if we'd hung them up at night. It was also something which slowed us down when packing up as we'd either have to dry the inside with something or wait until the sun did the work for us. In practice we did the latter but at the end of the day when we tried to pitch while the sun was still high enough to air the tent before we set up beds.
3. It's heavy. Just about manageable for one person but to get it onto the rack is quite a heave and to avoid damage it's probably best to consider it a 2-person job. Mike did try to balance the tent on it's end against Daphne's flank and then pull it up onto the rack, but the rocking about as he climbed onto the roof sent the tent sliding sideways, nearly wiping off a door mirror.

Just as an experiment we made a frame that "plugged in" to 2 tubes tie-wrapped to the rack. With a curtain this gave us an enclosed area at the rear which was ideal for a shower room.

Like this:


When not in use the frame slid into the tubes on the rack.

It was a bit of a faff, though, to attach the curtain so we only used it a couple of times since site showers were always available. It was quite useful as a changing room after a kayaking session, though as Mike found it a bit of a challenge to get into and out of a dry suit while lying down in the back.

So, that's how we lived for 3 years of touring holidays and until we began planning our first Moroccan safari. This is when we did some -well, actually, a huge amount - of research into the country and the conditions we were likely to meet. We'd never taken Daphne off-road for more than a few hundred yards and had no real idea of what she and we were capable of. Clearly some kind of "trial run" would be needed and under the sort of conditions that if it all went wrong we'd have some kind of support on hand. With that in mind, we signed up for a tour of the back roads of the Alps with a guided group......


Thursday, 16 March 2017

Still trying to get it right...Daphne Mk3!

This project has become a lesson in Getting Things Wrong. Getting It Right has followed from the mistakes, but it would've been better not to make the mistakes in the first place. And cheaper, too. Take the fridge as an example. We've gone from freezer bag to electric cooler to icebox and none of them worked for us. The electric box was a total loss and we recouped about 60% on the icebox, so the next attempt had to work, which meant spending a lot more than our original budget. After the usual weeks of market research and scanning the reviews, we opted for one of these:
This is the Waeco Coolfreeze CDF25. We also bought the transformer that allows an automatic switchover from 12v to 220/240v so we can pre-chill it or run it from site electricity. This combination cost more than we'd originally intended to spend but it actually works like you'd expect a fridge to work, and it'll do a pretty good job of freezing stuff too. In fact, if we write a list of Pros and Cons, one of the Cons is that the temperature selector doesn't have much travel (you can just see it on the far edge - the back) - it's a tiny slider, so the difference between perfect Chardonnay and a wine-flavoured icepop is about 3mm. Once used to it, though, it's very good and takes up less room than the other - unsuccessful - options. It's the same width as the kitchen unit so doesn't get in the way of the sleeping plan. The lid opens upwards, though, and because we wanted to fix it along the fore-aft axis and against the OS door this made it very awkward to open..

"Right, that's the essentials sorted, now what are we going to eat?"


The fridge support has been altered a little to make it easier to remove.

You can also see here the "working prototype" - upside down-  of the camping table-cum-bedboard discussed later in this post.

 ...so we made a sliding support plate for it similar to the cooker but using heavy duty industrial drawer runners. This allows it to be pulled to the centre of the vehicle and makes it possible to lift the lid and rummage through the contents without having to half-crouch or need 3 hands. It can also be accessed with the OSR door open which makes it easy to put the groceries etc into it. When the lid's raised it's held open by the bungee net above it. Another "con" perhaps, the lid. It's designed to be lifted right off once opened to about 80 degrees; this means that it often comes off when you didn't mean it to and it's a bit of a faff to re-engage it; we never found a fix for this.Two bits of ally angle keep the fridge in place laterally and the sliding tray locks with a bolt.  A webbing strap passed from front to back over the lid holds everything secure and is tensioned with a cambuckle. We found we needed to build a "bridge" over the fridge controls or the tensioned strap would bear on these. It only needed a tiny amount of unplanned movement to convert tonight's steak dinner into tomorrow night's when we found it frozen solid. The transformer goes underneath behind the gas bottle.

These drawer runners are the "double slide" type which allows the tray to move twice as far.
We now decided to get rid of the HD bedboards, even though they were capable of being used as bridging ladders! Far too heavy for the job they did. In their place we substituted a piece of 12mm ply, suitably stiffened. This was our new table and with fold-down legs made from telescopic walking poles it hooked to the rock sliders. After a little more experimentation we altered it a little more and it became like this:


The support legs became one leg but a little more robust - the lower bit of a hospital crutch - while the other end was supported by the tube we use for extending the wheelbrace. Eventually we arranged a system where this could be plugged into a piece of correct diameter tube welded to the bottom of the roofrack ladder or strapped to the rock sliders.
This gave us several ways of setting it up depending how much shelter we needed. It was, though, still quite heavy for the job it was required to do so we carried on developing the idea.


Eventually, and for our second Morocco trip we combined the solar panel cover - yet to be discussed- with the table, so right to the end we were still improving/adapting or otherwise messing about trying to find the ideal solutions.

At about year 3 of our ownership we visited the Adventure Overland Show at Stratford. This was mainly to see how other people had solved the same problems that we were working on but also, lets be honest, to see what Landrover toys there were available that we could convince ourselves we needed. The show runs over 3 days and is well worthwhile for the reasons we went but also for the number and variety of guest speakers who run seminars or just chat. Remember that up 'til now, Daphne was a weekend kayak transporter that provided a refuge from annoying bugs and for 2 weeks in the summer had been a base for a camping holiday in France. We decided to sit in on a talk by a chap from Canada called James Davis.
This might become a picture of Mr Davis and his interesting car, if I can get his permission to use it.

We'd seen his Landrover "cabriolet" outside, complete with Dulux pink paint job, and he seemed like an interesting guy. He talked about how he'd gone with a bunch of friends and explored the Rekkam plateau in Morocco....by the time he'd finished his slideshow, we were hooked. Morocco. Let's go there. From that moment, everything we did for and to Daphne had one aim  - a solo trip to the Sahara. We left the room with a bigger shopping list than we'd gone in with, in our minds at least. We went straight round to the trade stands....

....and bought some of these:
These are Wolf boxes. They stack together, are very robust and can be used as seats, hop-ups, and bed bases if you're prepared to do a little carpentry to modify the then existing arrangements:


 As you can see they were exactly the right size once we'd raised the side bins by about 2cm - a strip of wood under each long edge did that easily. This gave us more storage and allowed us to get rid of the shower-slat floor. We now had a flat sleeping platform which could be used as the bottom layer of a load stack as the boxes interlock with each other. They aren't waterproof like the previous boxes but they are a lot stronger. Cons? ("Oh, you're soooo critical") - they aren't transparent so need labels if you don't want to spend all day searching for your spare socks, and the little clips that lock the lids on can be a pain to engage and can be easily broken unless you take care. We bought some spares in metal but, to be fair, we haven't needed to use them but the design weakness is there.

Given that we'd now interfered with the geometry of the kitchen unit by making it higher, the whole lot needed redesigning since all the little corners and angles that were critical to keeping the structure stable by wedging it in place didn't work any more. In short, we'd messed up a lot of things by improving one. It wasn't exactly "back to the drawing board", but in working out the way to fix what we'd just screwed up, we could get rid of the useless sink and re-invent some other things that'd not worked as well as we'd thought.
We started with the kitchen storage. I'd thought - not being the chef - that the floor level bins and the spaces under the cooker and the the sink would be adequate. I was, ahem, advised that this was not the case. Not only was more space required, it had to be in better places and easier to access.

We still needed a sink, but in a more useful place, which turned out to be hanging off the back door...

 First, we just did this. Quick and simple, and like most things Quick And Simple, it didn't work. The bowl protruded too far and with the new Wolf boxes inside, the door wouldn't close.
This was a pity, because I put a lot of effort into making this into a proper "stainless steel" kitchen sink (OK, polished ally, but it still looks good, eh?) and broke 2 jigsaw blades doing it, All this was done before we bought the boxes....One step forward, two steps back.

So we redesigned - again - and finished up with this:


We got rid of the cardboard-and-vinyl trim and replaced it with a sheet of aluminium rescued from the bin at work, hinged a flap off it and cut a hole for the sink, which is now a collapsible plastic/rubber bowl. This allows it to fit neatly into the space at the end of the boxes. We might've got away without the bother of cutting the hole, but it gives a nice solid anti-spill place for the bowl and brings the top of it down to a good height for all sorts of uses....


We moved the first aid kit to the back door as we reckoned that to have to go searching for it inside defeats the object of having it. Likewise one of the fire extinguishers. The security grill for the window was made of the stuff used to make chicken cages. The odd bit of welding - my first project with the MIG - and some P-clips and the window is as secure as it can be without spending a lot of money. The cost of commercial grilles is ridiculous given that if someone really wants to get in they won't stop 'em for long, so these admittedly flimsy alternatives might at least discourage casual glassbreakers - the true nature of the thing can't be seen from outside. It's also a really useful place to peg up the washing. I tried the same thing on the side windows but these had to be on the outside and so a lot stronger. In the skip outside work was an old mattress base which when cut in half happened to be just the right dimensions.....


and with a bit of cunning the mounting points could be hidden. The grille was bolted on using anti-tamper fixings and some "streamlining" added to the square ends just for aesthetics. Once fitted I tried hard to pull these off and couldn't so, short of bolt cutters and a lot of time we reckoned these were at least as good for keeping the Undesirables out as the commercial alternatives.

The storage problem was less easy to fix. Obviously a more vertical arrangement was necessary but building cupboards was going to be difficult given that the whole unit was going to flex. I could see doors either jamming or flying open, turning Dapne's back end into carnage. Luckily I had these in the back of the shed:

These were delivered to an aircraft I took into a south coast of England airport one lunchtime many years ago. The local handling agent used them to deliver our sandwiches and didn't want them back. Some folk might recognise their origin. They kicked around the hangar for a few months before I used them as garage toolboxes. Although they were a little too deep to be ideal, they're very light, well made with secure door closures and internal ribs that allow shelves to be adjusted. Too good to ignore for the project, and provided extra shelf space on top as well.


So this is pretty much the final version of the kitchen. We've hidden the main water container away in the aft cupboard and added a magnetic tool holder to the edge of the cooker to keep utensils off the (dusty) flat bits. The extractor fan with cover is above the cooker. The flap/door to the middle-level cupboard has been redesigned to fold out and lock into a double-sized table which is also removeable and can be used like this:

...which gives even more flat bits for the chef to cover with stuff.

So, that's the interior mods covered and is how Daphne was when we sold her last year. Now we'll move on to the outside and show you what we did about tents, awnings, roofracks and all the rest of the clobber that we (thought) we needed for our Saharan adventure.....