 |
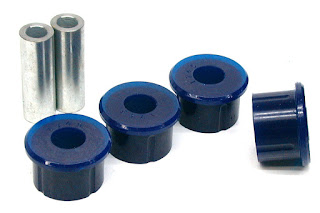
Yeah, OK. That aside, I decided to go ahead and try it myself. Getting the rod off wasn't too difficult but there isn't much room underneath the engine and one of the nuts was 'kin tight. There's not enough room to get a socket onto the nut so I used an adjustable wrench on that end, and a 22mm socket and breaker bar on the bolt head. Not recommended practice, but I was going to bin the bolts anyway. All out, and the bolts were "shouldered" and well in need of a change. The soft bits, once I'd cleaned the dust off, turned out to be blue Polybushes. These are often considered to be "better than the originals", partly because they're easier to fit without the need for the aforementioned 20 tonne press.

The bush at the chassis end had a tiny amount of play in it, but enough to hear a "click" when I was swinging on the rod underneath. From what I've read, this might be a source of the "wobbly wheel" we've been trying to cure for months. As the cost of a genuine new set, plus bolts, was less than getting all the wheels rebalanced, I thought it was worth a try. At a guess and based on what little reliable evidence I uncovered during the saga last year, these bushes had done about 20,000 miles.
They wouldn't push out so I burned them out with a blowlamp. A smelly, messy job but simple enough. Now to press the new ones in. Being the original rubber ones, I reckoned I could get them in using a bench vice and a couple of suitably sized sockets to do the pushing. Now, unless you've got a nice big vice, I wouldn't recommend this - as I turned the screw I could almost feel the metal wanting to explode under the pressure. However, it worked right up to the last 3mm or so, when I had to change to a slightly different diameter pusher...This then slipped and crushed the sleeve of the bush....oh dear! Or words to that effect.
Now, if I'd been anywhere remote then I'd have cleaned up the damage and carried on, but clearly not in this case. Once I'd got the damaged bush out - and this took an hour and a lot of smoke and chiselling - I was now faced with a choice - use the Polybush kit that I already had or have Ian Watt's team get another "proper" bush and press both of them in using a proper press. I chose to let the professionals do it. This involved a 48 hour delay as not one motor factor or dealer within 50 miles had another bush except the local Landrover dealer. And it cost FOUR times the price of the one I'd damaged, the alternative being to wait until I could get another by mail order.
Refitting the rod was simple enough although since I couldn't get a socket onto the nut I'd need a better way of tightening it - putting the torque wrench onto the bolt ain't a good idea. This required another investment of nearly a tenner at Halfords for a 22mm ring spanner. As there wasn't enough room underneath to get a decent swing on the thing, we had to get the front end on ramps and make a lever to put on the spanner...
...and since I didn't have a Sorcerer's Apprentice handy - Sue was busy - I needed a 3rd hand....
 |
| You can see that there's no room for a socket on the nut (at the back). |
I had to guess at the 88Nm the nut needs. When I took the rod off the NS was quite loose compared to the OS, so I gave them a half turn past "V Tight" to make them "F Tight" and I think that'll do. A quick test drive and ....result! The wobble is no more! Cost? Well, given the need to buy the spanner and the very expensive new bush the bill came to very little less than if Sandy had done it all, but I've learnt a little bit more about Landrover fixing and that's always a Good Thing. He made no charge for the work he did, either. Polybushes? Despite all the hype I don't think that, in this case anyway, it's worth fitting them unless you happen to have a problem away from a decent workshop. I'll carry mine in the spares box because I won't need a press to fit 'em but I probably won't need to repeat the job for a long time yet.
Another good reason for doing the work myself is here:
This is the NS track rod end. If I hadn't been underneath doing the Panhard rod, I'd never have seen this. Given it was cold and wet I almost put this job off but eventually persuaded myself that I might as well get on with it since my hands were dirty anyway. Because at least one of these things seems to need replacing before every MoT test, I had a stock of spares on the shelf and the job took less than an hour. I'll still need to get the wheel alignment checked properly, though, since the outside of the NS tyre looks like it's getting a scrubbing, more so than the other side, anyway.
The last task was to clean off the oily gunk under the sump and oil filter. The reason for this was stated by PITA as a "leaking sump gasket". I discovered a few weeks ago that the oil was actually coming from a split in the crankcase breather hose so this has been replaced and we no longer have a little spot of oil underneath everytime I park. Cured? We'll wait and see but it looks good so far.


No comments:
Post a Comment