Tuesday, 6 June 2017

Private Investigations.


♫ It's a mystery to me - the game commences.... I go checking out the reports - digging up the dirt...♫

I had that Dire Straits tune in my head several times...

So, the main reasons why I bought this Defender - the galvanised chassis and Ashcroft gearbox - may not be what TPO claimed them to be. I found this very difficult to believe. While my intuition ain't perfect I normally get a feeling when things aren't right, and I didn't get that feeling when we had our long chats on the phone and on-line. He seemed perfectly OK and "in tune" with me. This is very disappointing, but there's probably a simple explanation. Surely Ashcroft have got it wrong. Richards too...


It's worth saying at this point that Ashcroft and Richards are reputed to be the Gold Standard in Defender gearbox rebuilds and chassis replacements. I did a lot of research before setting out on the search for Daphne's successor and these 2 items were on the Must Have list. Most things that're bolted to a Defender come into the "accessory" category - winches, fancy seats, tents, racks but not the chassis and the transmission, these "are" the vehicle. The only thing that should be added to that list is the 300Tdi engine. So, I was buying exactly what we needed as a basis for a top notch expedition vehicle. Or so I'd been led to believe.

At this point the DVLA sent me a cheque for the unexpired period of the Road Tax. TPO had taxed it for a year, right? All agreed in writing and done on the day of sale. My mistake was not standing over him when he did it. The refund was for the balance of SIX month's tax, not twelve. If I hadn't taken the truck off the road I wouldn't have found this out until too late. I'm impressed again, and like before not in a good way.
Our subsequent on-line conversation was a little terse. With "apologies" he would send me the balance owing for the tax and yes, the receipts for the chassis and gearbox would be "around somewhere" and would be sent to me. As already promised, in fact. Similarly he'd send the service checklists showing what had been done and when.

With alarm bells now ringing, I did some checking. It didn't take long, with the Internet's long memory and perfect records, to discover TPO's on-line persona. On a well-known UK Landrover forum he'd described the rebuild of "our" Defender but it had apparently been done 2 years earlier than he'd told me. He'd made a big noise about how much it'd all cost and that the gearbox and chassis were the best available - Ashcroft and Richards, "of course". I was now beginning to think that whoever had done the rebuild had conned him, and I really wanted this to be sorted out. I scrubbed the casing and sent a photo of the gearbox serial number to Ashcroft, hoping they could trace it in their records.


This isn't the number stamped by Ashcroft, it's the original Landrover number. It's from a Disco, and Ashcroft had no record of it. Whatever it was, it wasn't the original Defender box and had never been through their workshop. Bugger. Photos sent to Richards were less conclusive but the method of manufacture - welded edges, not folded, suggested that it was an early product and may not have been laser cut with the RC logo. The jury's out on that one for the moment, then.

A few weeks went by and then completely out of the blue and with no explanations or apologies, I got this:
I'm sure that AW Transmissions are a perfectly sound company, but I paid for someone else's product.


Now, I might be getting old but I'm not yet senile so if I'd paid a lot of money for a recon gearbox I think I'd remember where I'd bought it and not "remember it was an Ashcroft (gearbox) because it began with an "A"". No kidding, that was TPO's excuse, and from a bloke who's paid a lot of money to have- and use -his brain. He went on to say that he "now fully admit(s)" that it isn't an Ashcroft box BUT I should think myself lucky - the box I'd been sold was "more expensive" and if I wasn't happy with it I could refund him the difference. Or keep the vehicle and he'd "buy it back off me " at some time in the future. No, there are no typos here, that's exactly what he suggested. I was somewhat surprised at all this and that's putting it mildly. Does he think, perhaps, that I arrived from outer space yesterday? So he hadn't been conned, he was actually an idiot. And given his on-line bragging as far back 2010 regarding the gearbox's origins and his claim of everything being "desert and mountain proven", maybe a bit of a Walter Mitty as well.


Photos of the service history pages had been sent quite early in the argument to quieten my fears that the date of the major work was in doubt -2010 or 2012?. Paperwork with various dates appeared but the important ones - the date of the chassis and cambelt change clearly showing - or claiming - the work had been done in 2012 by a garage in Sussex. The garage stamp and the proprietor's signature on one page gave it some legal status in my view - they were saying the work had been done. Of course, someone could've added these notes at some later time to try to give credence to a statement, but no-one would do something like that. Would they? Especially if there was on-line evidence that it probably wasn't true. That would be just stupid. Eh? Did somebody say something?


The note in the box reads"chassis swap Dec 12, cam belt 12"
I believe the garage is entirely innocent here, so I've done a bit of "alteration" myself.


 As the legal wrangle intensified TPO sent me, via his solicitor, the original service paperwork so long overdue. You might notice the difference between the picture below and the one above:


The one on the top is the one sent to me to "prove" the date of the cambelt change and chassis swap. The lower one  bears an uncanny resemblance to the other. In fact, it's the original document from which the one above was copied but now with a clumsy attempt to disguise information previously presented as original and genuine. I don't know what the legal position is here, but I can make a pretty good guess. Basically there wasn't a lot of accuracy in the original advert on eBay or in subsequent discussions and I think there's a definition of this.... Some people think this is up to the buyer to spot. It's not. If a seller tells a buyer something that he knows to be incorrect, untrue or misleading it's up to the seller to put it right. We debated the point for a number of weeks, getting
increasingly annoyed with each other. In the end I did some research on my legal position and threatened to sue him. He responded with threats of how a court would see I had no case, that his wife is a barrister and I "would lose and it would cost thousands".

 So, what to do? Should I just write it off to experience? Buyer Beware, and all that? I considered my position, as they say, and decided that it wasn't TPO who'd been conned, it was me. Did he know the truth or had he somehow convinced himself that he'd actually bought an Ashcroft box when he researched, ordered and paid for a product from a different supplier? Given his obvious intelligence I doubted the latter so assumed the former. I sent the forms to Money Claim Online and waited for the screams of indignation. After 6 months of argument and the predictable threats from his solicitor (not wife), he agreed to pay for the AW box to be removed and an Ashcroft unit substituted at his expense. Result. A pity, though. I really liked this guy initially and if he'd ben a bit more sensible/unstupid he'd have saved himself a lot of money.


So I eventually got what I thought I'd bought in the first place. But...it was never going to be easy, was it? To swap the main gearbox the transfer box has to be moved. When the guys at the garage took the bolts out, one of them was a bit of a bitch to undo. This is why:


Whoever had reassembled the transmission when the chassis was rebuilt didn't know that not all transfer gearbox retaining bolts are equal. One is longer than the rest and there's a reason for that. So, if you don't put it in the correct hole it's too long and protrudes into the casing.

The hole is now 15% bigger after being reamed out by the bent bolt

  It then jams the gears and the transfer box and the propshafts won't turn. Or rather, it  is very difficult to turn these things unless considerable force is applied.This would set alarm bells ringing if it were me, but clearly the muppets who did this job had no such concerns. Just get a length of scaffolding and use that as a lever - that'll sort it. And it did. The bolt got bent and chewed up and the nasty metal scabs then got spread around the box like shot from a 12-bore. When I got the Good News at work I went round to have a look and spent 15 minutes scraping bits out of the transfer case before we came to the conclusion that it wasn't worth putting it back in that condition and would probably cost several hundred quid to sort it locally.

Reminds me of Bob Marley on a Bad Hair Day


Back to Ashcrofts - " Thanks for the R380, now can you send me a 230 box and get it here tomorrow?"
 

 After a week we got it all back together and ready for a road test. The speedo was now playing up - jittering about then failing completely after 15 minutes or so. I bought a new drive gear, thinking the old one might not like the new transfer box. As I crawled underneath to fit it I found what you see here - a lot of oil spread across the chassis, coming from the transmission brake. This suggested a faulty oil seal. Ashcrofts suggested I took it to a Landrover specialist in Inverness to look at, at their expense.
The problem turned out to be a nut that wasn't torqued up enough so quite easy to fix.


This didn't solve the chirping speedo though, so I asked them to road test the whole thing to see if we could diagnose the problem. During the test...bang...clang....clatter....


Sigh..*#. Anybody wanna guess what this is?

It's the mounting flange for the drive pulley that sticks out of the front of the water pump. It's sheared off across the shaft. A one-in-a-million fault, apparently so no surprise that it happened to me. I'm beginning to regret ever setting eyes on this truck and its previous owner even more.
I did, of course, have a spare water pump. In the spares box. 45 miles away. So another fistful of dollars to replace the pump that I needed to get me back home, where the other one was....I'll refrain from mentioning how much this little escapade has cost - that's something I wouldn't want to shout about, unlike The Previous Owner.


Now I have a Defender with two Rolls-Royce standard gearboxes. Peace of Mind costs, and a lot more than I bargained for but hey, I know exactly what's under my feet now and this is worth all the hassle. I think...

Wouldn't want to do it again, though.

Anybody want a brand new water pump?

Sunday, 21 May 2017

Creating a Camper

With the vehicle now legally off the road we got on with redesigning it to suit our needs, mostly as a result of the mistakes we'd made - and corrected at some cost - with Daphne.


Water tank refitted with push-fit pipework.
The first thing to do was remove the accessories like water tank, rock sliders and electrical stuff and give them an inspection, overhaul and maybe put them back on. The water tank is a useful thing to have as it does a number of things. It gets liquid out of the cab, so less likelihood of messy leaks, it gets the weight of said liquid low down on the vehicle so helps centre-of-gravity and it makes access to it easier since we can set up a pump to get it into the place where we want it - like a sink or kettle for instance. The downsides: it's difficult to know at a glance exactly how much is in there, the tank must be kept clean and if contaminated water is allowed to get in then it'll affect all the stock rather than allowing us to realise it's a "bad bottle" and throw it away before the rest is spoiled.
    But that's assuming that we can get the water into it in the first place. I noticed that the filler cap, inside and on the NS wheel arch box, wasn't screwed on properly. I took it off and put it on straight, or I would've done but it resisted my attempts, always sitting at an angle. A closer inspection revealed that the filler neck, poking up through a very roughly sawn -read chopped-  hole, had been screwed in off-centre because the hole was in the wrong place. We corrected this, repaired the butchery on the wheel arch and replaced the tank once we'd welded a new bottom onto the supporting cradle. The original was so rusted there was almost nothing left of it. Hopefully the coat of Hammerite will extend its life.
  
The long-range fuel tank pipework was quite old and in need of replacement but we decided to leave this is place for the time being. It would have to be completely removed to get access to the bolts that hold the body to the chassis. I'd need to do this to fit the swingaway wheel carrier we'd taken from Daphne and the job was a lower priority than getting the interior sorted out.


Being summer in Scotland the wind and rain prevented us from making a quick start on the repairs to the bodywork and prepping for the respray she badly needed, so I began work on the "furniture". This meant sorting out some insulation from heat, cold and noise before we could do anything else. A sheet of foil-faced adhesive soundproofing went onto the metal floor. With the possibility of perhaps needing to lift it in future we didn't expose all of the adhesive, just enough to keep it in place and hold the edges up to the sides of the tub. Hopefully this will act as a sort of container for any liquids that find their way down there.

On top of the soundproofing went a sheet of 12mm marine ply - waterproof...or at least less likely to affected by it than the normal cheaper stuff. We then cut a hole in the side to allow the fitting of an external filler tube for the water tank. Since the filler cap is inside and towards to front of the cab, the chance of of spilling water when filling it is pretty good, not to mention probably having to move the load around to get access. At least an external filler cap would make that job a bit easier. The "elephant's trunk" can be pulled out and tucked to one side so I've put a warning note on the filler cap outside: "Have you connected the hose?"

The fuse box for the rear tub electrics is going in against the bulkhead.

The wheelarches were then covered in self-adhesive soundproofing mat from "Silentcoat". Again, this is waterproof and really easy to cut to shape. We used the same stuff to line the lower tub sides and the large flat panels of the sides once we'd put in 2 side windows. Those of you who don't drive Defenders of this type won't know that coming out of junctions can be very dangerous unless the driver can almost stand up in the seat to see around the passenger's door frames. I decided putting these blind spot windows in was a priority, which you can see in the picture above and here:


The Silentcoat panels were also used on the roof and anywhere else we could find that was likely to vibrate, like the inner faces of the door panels. It doesn't seem hard wearing enough for the floors though, so we used Noisekiller sheet for those areas.


The rear door, de-rusted, a bit of welding and primer and Silentcoat vibration dampers.


This made everything look and feel a lot tidier. We wondered about the clinical look of the reflective surface. It made the inside a lot lighter but while working inside while it was raining - again - there was quite a lot of condensation forming on it. This is inevitable since there isn't much in the way of thermal insulation here, it's almost exclusively noise, so the cooler outside of the roof and sides makes the inside cold too and the Silentcoat just acts as a thermal bridge. We decided to cover it with a heat insulator later.

At last, time for some carpentry. I used the bed of the sliding floor system to make up the storage bins. At 18mm it's a bit heavier than the 12mm we used in Daphne but provides a really solid base on which to build everything else and it won't flex quite so much. This might turn out to be a disadvantage but it's worth the experiment.....
Because we wanted to be able to remove them easily, these side bins were made so that they were held in with the minimum of fixings, relying more on geometry to keep things in the right place. The various components go together in such a way that one locks the next into place, running around the tub in a "U" shape. The only parts that have a solid fixing to the floor are the open ends of the "U", at the back by the door.


The NS bin is narrow to provide legroom for the "chef" who sits on the right (OS). The ply top for the OS wheelarch is in place and isn't fixed down except by 2 lashing rings yet to be added.

The OS storage bins/seats are sized to hold plastic boxes with kitchen equipment (the front 3) and emergency gear (the one nearest the door)

The covers for the storage bins are a snug fit and all are different sizes to suit the contents.

The gap between the NS and OS bins is carefully measured to allow the Engel fridge or Wolf boxes to be slid into the space.

We had to move the reg plate down a little or the top half is hidden behind the ladder when it's fitted. The lock plate, below it, is a bit OTT but certainly effective.


Now the rubber mat that covered the sliding floor can be fitted. There are no joins, which further waterproofs the floor and makes it easy to sweep out or wash as there are no sharp internal corners or gaps for water to get under.
With the floor covering in place the end brace is fitted. This keeps the front ends pressed firmly into place against the wheelarches. The aluminium angle that was used on the slider was re-cycled to hold the rubber edge in place while some carpet edging strip provided the runners for the fridge. The Engel is quite heavy and awkward to manage in such a confined space but the metal runners give it something easier to slide along instead of a grippy rubber mat. A short length of load rail provides the means of stopping it breaking loose and becoming a hazard in a crash.


At this point we began the decorations...not just to make things look nice, either. The varnish provides a wipe-clean surface. We used thin hardwood (beech) panels and strips to line some interior bits just to give a sense of unity to the design.
Here you can see we've started experimenting with storage nets and have replaced the front headlining. Even though we had repaired this and stiffened it, it was soon removed as it sagged a little and smelled a lot.


With the bins sorted, they gave us a base for the higher level counter-top and stove. We used the same airline food containers that we'd used in Daphne but aligned along their "sides" so the doors now open downwards.


 A nice new stove was fixed to the top using drawer runners like before. These allow the chef to move the stove to a more comfortable position.


Lastly, we put a sink in. This is something we dispensed with in Daphne but since I needed somewhere to catch the drips from the new plumbing system, we have to put one in. The bowl is removeable, though, so the hole allows me easy access to the pump and other rear-end electrics and it can still be moved to the back door fold-down shelf (yet to be fitted) for Me to do the washing up. I hope the ladies note that last bit.


 Why didn't I make the hole a bit larger to allow the bowl to sit a little lower? You'll see why here:


The gas has to go somewhere....I thought about putting the gas into a locker in the wheel arch, like we put into Daphne, and maybe I'll do that eventually. It's obviously not ideal to have the gas inside and although we've not had a problem with this arrangement in the past I'd prefer it to be outside. As it is, having the bottle accessible inside means we can turn the gas off without having to expose ourselves to The Midgie - a vital consideration, in my opinion.


We put a storage shelf over the cooker and added the electrics to power the water pump, lighting inside and out and a radio/CD in the rear so we had a separate music source accessible in the kitchen which runs off the aux battery.


The interior lights are LED strips or capsules which use almost no power while the external ones are also powerful LED units that provide high-level reverse and work lights.


    Eventually, with everything in place the back end/kitchen/bedroom looks like this - 


If the fridge is moved up to the wheelarch level - to the left as you look at it - then a third Wolf box can take its place and this provides a level surface to support 2 inflatable sleeping mats - a double bed.

At last the weather improved enough for me to finish the bodywork prep and do a respray. You may not think it was worth the effort but the limp-wristed primrose colour - "Mad Yellow" according to TPO, The Previous Owner - was pretty washed out and faded so we gave it a bit of a perk-up with a coat of Daphne Yellow  - RAL1021 if you're interested.


So, here it is with some of the mods and a new coat. Colour-coded wheel arches! Cool or what? OK...I just thought they looked better. The spare wheel was moved to the bonnet and a better bonnet lock system fitted. We made an access for 240v and solar power cables just behind the door and the filler for the water was faired in with metal putty. The rear wings were reinforced with chequer plate donated by TPO. I wouldn't normally use the stuff like this but the body had suffered a couple of dings and was a bit crinkled here; nothing terrible but potentially expensive to properly repair. Since I'll probably be cutting into this area for the gas locker anyway I decided that the chequer plate would do for now.
The side serving hatch is an expensive modification which works well enough but lends the truck a bit of a "burger van" look. I've tried to disguise it. I guess it'll be useful to serve food from and certainly makes ventilation of the kitchen a lot more effective (bugs permitting). We lined it with an extra thick layer of soundproofing as it vibrated like a Boombox.

Access to the roof would be impossible from the back once the roof tent was in place, so we added 2 mast steps to the driver's side.


Finally, the roof was lined with foil "bubble wrap" insulation with closed-cell foam  - Decathlon camping mats - to provide the inner layer. Hopefully with these 3 layers of different materials we've got noise and thermal insulation sorted. It was a pain trying to get the last 2 layers to stick, though. Spray adhesive would seem to be the way to do it but the stuff I normally use - EvoStik - seems to have had it's recipe changed. It used to stick anything but now it doesn't have that petrol-like smell and, frankly, is about as useful as spit to stick anything heavier than wallpaper. I had to use a layer of "No More Nails" spread as thin as I could get it.

The last job, I thought, was to sort out the rock sliders. When removing the water tank I had to also remove the NS rock slider to make room to get it out. I was expecting the slider to be firmly bolted in place, given that they are supposed to be solid enough to use as jacking points. The front fixing was the correct size chassis bolt but the rest were barely strong enough  - M6 - to hold the bloody thing on, let alone take the weight of a loaded Landrover on a jack. The other side was the same. Clearly the mounting holes hadn't lined up with the holes in the outrigger/chassis mounts so instead of doing the job properly by drilling them out from a welded cover plate, M6 - that's 6mm - bolts had been forced in at a 30 degree angle and large washers used to take up the slack, so to speak. The likely result if these had been used as designed is a little concerning...but like some other things, they looked the part. If that's what you want.

While I was down at floor level I had a good look over the galvanised chassis. Solid, as expected, but is something missing, perhaps?


Daphne, after 2 trips to Morocco, wasn't black underneath but pink. Desert Dust. Now, this vehicle was advertised , you might remember, like this: 

"I completed a 5,000 mile trip of a lifetime to Morocco without even a single mechanical failure.

It is mountain and desert proven (Rif mountains and Atlas)"
Maybe I'm being a bit picky but that, to me, means it's been on a "mountain and desert" excursion to Morocco and returned without major incident after 5000 miles. Everything performed as expected and is of proper quality. In other words, one could use such an experience as a positive selling point and get more money as a result.

If, though, it had never been in sand deeper than a Sussex playpit
 the claim might be considered to be a bit of a fib.

So, given that there wasn't a speck of the Sahara anywhere to be seen either TPO had paid a lot of money for a valet to go over it with a toothbrush or he wasn't telling the truth. Added to that, I'd found out that all Richards' chassis are supposed to have a laser-cut "RC" in the chassis rail in line with the A-frame. This was absent. A bit concerned, I turned to the gearbox. Ashcroft boxes are inscribed with a unique serial number when they leave the workshop, so I noted the number on mine and called Dave Ashcroft's despatch office to confirm the date it was issued and called Richards with a few questions, too.

Oh dear.......


Monday, 1 May 2017

Poking around inside....

...Pandora's box....Right, stop that and get on with it...


Having arrived back in the Highlands at 3am I had a few hours sleep before setting off for work, dropping the truck at the garage on the way. Picking it up a few hours later the news about the bulkhead rust wasn't good but could've been a lot worse.

If a ship had a bulkhead like this it'd sink. This is the view after the dash was removed.

We needed to weld a patch to reinforce the hole next to the pedal box and this would need me to strip the dashboard down to the frame. Since the strip down would take about a day and the welding about 15 minutes we decided that I'd take the truck home and bring it back when I'd taken everything off and prepped the area for the work.

Once everything was out of the way the hole finished up being quite a bit bigger after I'd cleaned all the crud away, treated the rust and primed it.

Painted with weld-through primer from Screwfix - and it actually works.

Easy enough to fix after that and we took the opportunity to treat a couple of other dubious areas in the footwells.


All sorted and the vendor met me halfway with the cost. However...while taking the dash off I had to move several other fittings out of the way to protect them from the welding. Like the seats. This wasn't too difficult as they weren't exactly bolted down in a crash-proof fashion. A mixture of the correct Landrover screws, roofing bolts and other random hardware. One bolt was undersize but had been padded out with insulating tape and jammed into the hole. One fixing was missing completely so the passenger seat could move about. They looked good, though. I didn't, apparently, I looked annoyed....

Then the battery. Remember the battery that I "might like to check"? I had to take the seat off, I thought, to get access since it was an after-market upgrade with no removeable seat base. Nice seats. Very comfortable, like he'd said. Once I'd taken the seat off I realised the seat box had been cut away on the outside to allow access to the battery - much like I'd done under Daphne's driver side - but it was covered and hidden with the rubber mat. Nothing lost in terms of time though as the seat was ready to fall out anyway. The battery was revealed, clinging to the car by it's fingernails, metaphorically speaking. The usual metal retaining strap wasn't fitted although someone had made a half-hearted attempt. The reason it wouldn't fit was the battery tray - a new one- was too long to fit into the battery box so was sitting at an angle, sloping down from front to rear. The battery, secured by friction and gravity, had slid to the length of the cables where it stopped, an inch away from shorting the live connector on the bodywork. I think I might've looked annoyed again.

The radio. Nice unit. Expensive, I guess.
 
 So you'd think it'd be properly fitted, not held into the dash with duct tape. There was so much redundant wiring behind it that it wouldn't push back into the DIN housing. The bit of the grey metal casing that was then sticking out was covered in black insulating tape to camouflage the fact that it wouldn't fit properly. The CB, like the battery, relied solely on gravity to hold it in place but that force worked against one of the extra gauges (EGT). The hole for this had been cut to the outside diameter of the gauge so it would fall through it with little effort. It all looked good, though. Is this beginning to sound like a "theme" here?

Turning to the other end of the box....an odd smell. The heavy duty wooden shelving system was well soaked in old oil, like the floor in an ancient engine shed. Black and malodourous, they had to come out. The floor lining - plywood - was in the same state, if not worse, and had to go. To do this I'd have to remove the "SAS Special Vehicle" sliding tray thing.

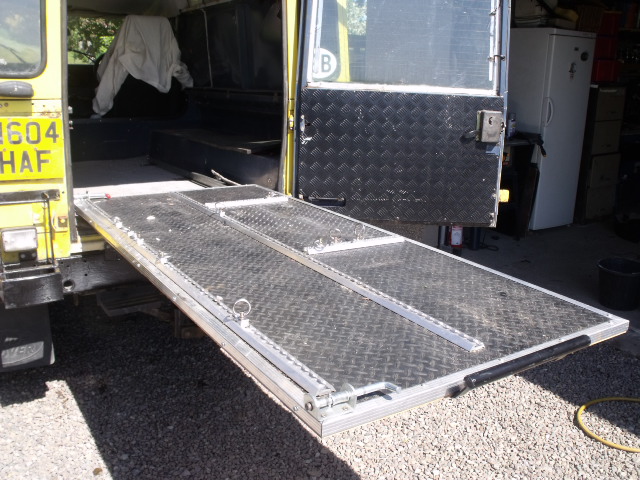
 This took most of a hot afternoon but, like the seats, was made a lot easier since not all the bolts needed to hold it in place were fitted and some that were didn't do much. While it sat, fully extended, out of the back of the truck the rubber covering started to buckle so I removed the metal trim and cargo rails. The whole lot then just fell off. Glued on with cuckoo spit. How did this thing stand the heat in Morocco? Remember that "mountain and desert-proven" boast in the ad? The auto-dismantling saved time though and I could recycle it for the new kitchen since the "Special Vehicle" sliding tray wasn't going back in. Quite apart from using up more space than it gave access to, it weighed more than I do. I've just been out and weighed it all. The metal sliding frame is 46kgs. Add to that the 25kgs of 20mm blockboard and about 10kg of load rails, fasteners and rubber sheet and it adds up to my weight plus a large bag of potatoes. An unbelievably heavy  arrangement that was completely OTT and since the most important bolts hadn't got any nuts on (which actually reduced the weight a bit) it wouldn't carry the rated load without failing.
 
 By the time I'd got this and the shelves out I reckon I'd removed about double the weight than Daphne had carried in useful stuff and about the same weight as 2 adults.
Behind the shelves was building insulation or rather, what was left of it after a colony of mice had finished with it.


Amazing creatures. The 50mm thick panels had been hollowed out leaving a pile of chewed foam and a wafer-thin skin full of air that looked perfectly normal from a casual glance. All this formed a large pile which grew bigger as more useless weight came flying out.

carpet and insulation (and mouse droppings) out


After another hour we got down to the metal
These are the ones that came out easily
but not until we'd dealt with a lot of rather unconventional methods of fixing stuff into vehicles. There was a good combination of self-tappers, what were becoming "the usual" timber bolts (the ones with the square nuts) and quite a few of the ones in the picture, which are antique woodscrews, I think. Since they didn't grip very well and had quite a load on them, a lot of them had been driven through the sheet metal and then hammered over at 90 degrees on the other side. A job for the angle grinder to get these off.


We eventually removed 78 "fixings" of various sorts, all of which had created a hole to the outside world that had no sealant, hence the mess under the plywood.

Perhaps it's the time to explain how our new truck was initially named. A long time ago, Sue and I bought a property that'd been "renovated" by an architect who boasted of his expertise in restoring old houses. We were confident, then, that all the work would be to the normal professional standards. Oh Dear. How wrong we were. This "expert" had done a lot of the work on our 16th Century cottage himself. Nothing wrong with that, but when, as the new owner, you're inspecting or dismantling his work you find that instead of using the conventional fixings for things, he'd made use of a biscuit tin full of random nails, screws and bolts. This made dismantling the amateur DIY work quite a challenge and a source of endless frustration. His name was Willoughby Fletcher. When you have to take a kitchen apart and find six different types of fasteners when one would do, you get the feeling  that something might not be right.....Now, how does that translate to our new Landrover....why use one type of fastener when 6 will do? And don't bother with properly sourced and spec'ed screws, bolts and nuts; just use whatever is lying around. If you happen to be building a house this might be any old stuff from the local hardware supermarket. Or that biscuit tin full of stuff you removed from Granny's bathroom and knew would come in useful one day.

So, add the moisture to the mouse shit etc and no wonder it niffed a bit back there. Each hole had to be cleaned up and sealed with aluminium tape inside and mastic underneath - we couldn't think of a better way to do this. There'd also been quite a bit of water getting between the tub and the side panels and running down behind the insulation, staying invisible as a result. The lesson here, we'd already learned, is to have the means of inspecting all these vulnerable areas in a Defender, and there are a lot. We slackened the fixings on the panels and on both sides of the foam strip injected the best sealant we could find that wasn't silicon and tightened it all up again. Leaks fixed.

Another 15 metres of redundant wiring came out, and a circuit breaker panel that wasn't connected to anything, the remains of some auxiliary lights and a lot of tatty foil insulation. This gave us a blank canvas on which to work and we took stock of what we'd removed and what could be re-used. The base and rubber of the sliding tray were clean and in good condition, as were parts of a shelving system (not the oily one) and the CB panel would be useful. Everything else was junk.
 
 I wish now that I'd taken a photo of the trailer full of jetsam that this "little job" had generated. I'd planned on re-using a lot of what we'd now have to throw away. You might be excused for thinking that I'd wasted a lot of money on this, but we always knew that we'd have to "redevelope" the living space according to the lessons we'd learned with Daphne, so this wasn't much of an issue.  Just as well. There'd been a lot of work to do that we hadn't expected and quite a lot more to get things properly sorted. With this clear, we decided to take the vehicle off the road while we did it - SORN it, in UK speak - and reclaim the Road Tax which still had 11 months to run. We'd save it for when we were ready to go on the road, we thought. Right? Wrong....